Train Your Ears is a revolutionary new Music ear training software tool for fine-tuning your ears and mind to the frequencies of different bandwidths, thereby showing you the differences between different sounds at a technical level as well as comparing before and after a bandwidth is changed. A fantastic product for both beginners and seasoned musicians alike, it goes into the granular details of equalisation, bringing a new perspective to a tool all music producers have encountered yet which is so commonplace that it normally becomes an accepted part of production. Train Your Ears is an incomparable way for all musicians to think more deeply about EQ – and in turn about their own music.
Why purchase this music ear training software?
Outside of simply requesting the user to match EQ bands with examples of noise which has been cut or boosted, this music ear training software allows you to move bands around to your liking and experiment with the interface to fine tune your understanding of how it works. In fact, Train Your Ears lets you literally take sound apart and reconstruct it – simply by listening to the different frequencies which resonate within it. So far, no other product comes close to giving the user this amount of freedom to experiment with sound – Train Your Ears is virtually unparalleled in giving musicians a way to EQ which matches their composition process.
When purchasing a DAW, there are many options for an EQ plugin which works for you. We have just recently reviewed probably the best new EQ software right now – Eventide Split EQ, read the review here. However, all of these tend to leave the user alone in terms of working out how to use them. In fact, they presume a pre-existing knowledge of the EQ process. Train Your Ears is therefore totally novel in letting artists combine it with any EQ plugin they wish to show you not just how the technology itself works but how noise itself interacts, creating real effects on the sounds of a song.
Too many articles on the internet attempt to teach EQ and fail because they are explaining a very nuanced concept in words – and yet it is one which is much better shown than told.
Train Your Ears does away with all the unnecessary written details and goes straight into showing you the difference between two versions of the exact same piece of music – one with EQ and one without. A typical practice session has seven bands which correspond to the division of EQ into bandwidths on a typical DAW such as Logic or Ableton.
It is very important for music ear training software products to provide the user with as much interaction as possible.
After a sample is played, it encourages you to match the audio with the corresponding bandwidth change, determining by how much it has been boosted or cut. Checking afterwards will then confirm how accurate your ear is.
The training session will then ask you to change the EQ’d signal so that once again it manages to sound the same as the original, and you are able to check afterwards to see if it is correct. The product also contains a monitor which allows you to see the exact level in decibels by which the signal has been boosted or cut, allowing a precise measurement of the amount of sound.
I personally found that the software easily translated from a digital product to actual, tangible results which I was able to apply to my own music. At first, I was not able to hear the difference between the subtleties of different bandwidths and the smaller, technical divisions music falls into such as bass and sub-bass, but with even a small amount of time spent listening to Train Your Ears, I found myself becoming more finely attuned, simply because I had reference points.
By allowing the usage of songs which are already familiar, the music ear training software product manages to hold attention and makes the process of getting deep into some of the most subtle and technical aspects of music much easier. It translates terminology which is understandable first and foremost to those who are intimately familiar with the equipment into something manageable for most if not all musicians to turn into a fantastic reference for their own production skills.
It could be assumed that the applicability of this technology heavily depends on the style of music you are producing. Some genres, such as heavy metal, have very specific, niche methods of production which do not necessarily align to the customary methods of EQ’ing. Therefore, for those working in these genres, one key point for Train Your Ears would be if it is adaptable to managing other methods of working. Personally, I found the interface had a beautiful cleanliness and simplicity – which means it is flexible enough that in the hands of someone familiar with their genre, it can be adapted to suit any kind of music.
Pointing out the different bandwidths numerologically also means that there is a tangible, logical, concrete result for any EQ changes. EQ changes are not just an abstract wall of sound – instead they are given as precise numerical data so you can see exactly which bandwidth has been changed and where – as well as keeping track of multiple boosts and cuts.
In conclusion, Train Your Ears is an indispensable way to get more in depth and understand the full picture of how EQ works before applying it to your own music. Any musician can benefit from it – whether novices or pros, it shows the real vibrations and elements which make up any production. Not only this, it does this in the abstract whilst also directly linking the sound you hear to measurable values.
In this way, it is a really valuable piece of kit – and most importantly gives you a way to change in real time an equalised piece of music to make it match the original again – demonstrating how much EQ’ing can change the sound of a song but also how, with the right skills, it is possible to manipulate it at multiple levels to reach a broader and more nuanced picture of your production, therefore giving the artist more freedom.
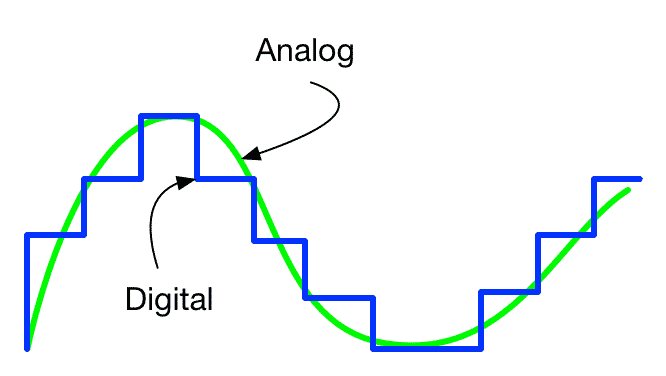
While analog seems like a pretty much forgotten domain, digital music production using DAWs such as Logic, Reason, and Ableton, has become the norm in the modern music industry. With so many instruments, FX, and VSTs in one place, they seemingly have everything a modern musician needs. Yet to expand the sound of your music you may want to combine digital and analogue sounds.
Choose your DAW
All round BEST DAW: Logic
Logic is by no means the only DAW on the market yet is the first option which many musicians jump to. Nevertheless, to combine digital with analogue it isn’t always the best option. Logic has such as wide range of different VSTs, plugins, FX, and ways to mix and master your music – but producing everything similarly can starve your creativity. There is no true BEST when checking out DAW options, but Logic is a great all-rounder that can do everything you need.
Check out these other DAWs for alternative options, if you are on a budget or if you are still learning digital music production:
Budget friendly DAW: Reaper
Reaper is basic, but this can be exploited by the savvy musician to further creativity. Due to not using much power, it can be modified with many of your own plugins or external equipment like external FX plugins for a low cost and streamlined way of working.
Great for beginners: Ableton
Meanwhile, Ableton live is a great way of bringing analogue gear into digital music production. By pushing the buttons on the live pads, even with entirely digital sounds, layering them can free up your creativity and create thicker, richer, and more nuanced sound. Loading both digital and analogue sounds, which can be run through FX pedals for a richer warmer sound or combined with digital instruments like synths.
Digital and Analog Music Gear: What’s on the Market?
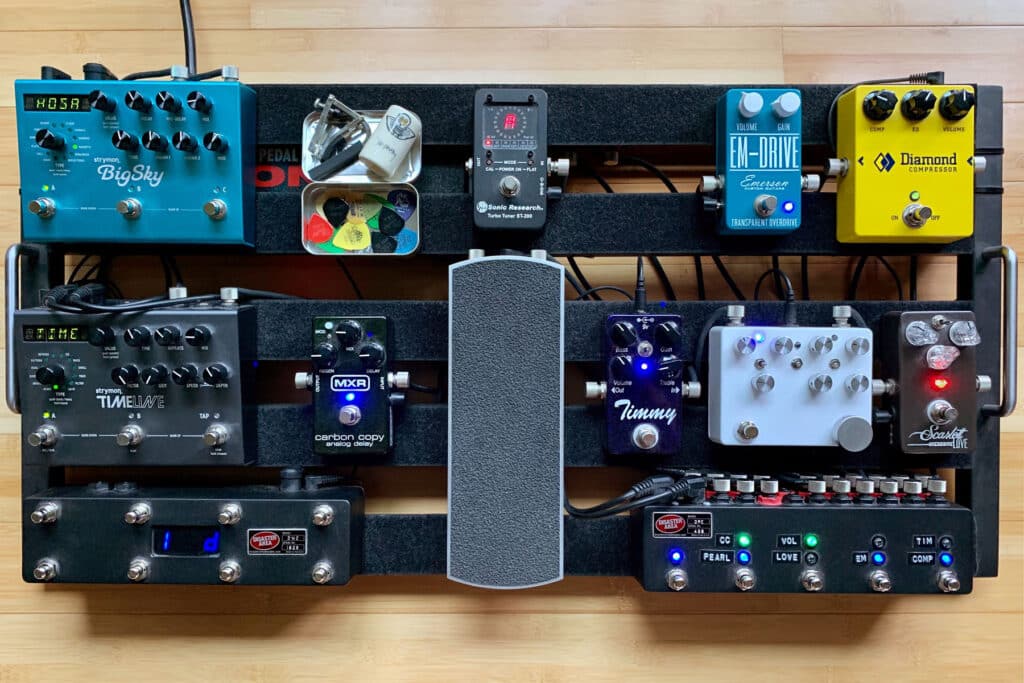
Using electric guitar and pedals, or stomp boxes, may not be immediately obvious in electronic music but can be done to great effect with low key guitar and heavy usage of FX making the humble Fender Strat or Telecaster sound otherworldly and unique, generating sounds which could not be achieved with digital FX or production but which you would not necessarily know were analog. For the rest of the article, we will only focus on pedals, leaving analog synthesisers and other instruments to a separate one.
I have experimented with combining analogue stompboxes and other FX pedals with digital production, especially with digital drum patterns. They work together very well when combined with electric guitar as this can be produced in such a way that its rich, raw analogue sounds are modulated and toned down to combine with slick electronic synths and drumbeats.
They can also change the sound of your guitar. So that it is less obviously a six-stringed electric or acoustic, making it ambiguous and therefore creating all sorts of fantastic and ethereal sounds. This can open up more options than may even have been on your DAW in the first place. It’s a reminder that sounds do not just come from our computers and online but that the world around us can be a constant source of inspiration.
Music producers usually group the pedals into different circuits on a Pedalboard
Best analog stompboxes for combining with digital music production:
Naturally there are loads of different stompboxes to choose from on the market, even within any one category such as fuzz or wah pedals. These are only a few of the possible options out there and are simply a good place to start.
Behringer
Behringer pedals are relatively cheap and are great pedals for beginners. There are many different kinds and they can easily be combined with your existing digital gear due to the fact that their controls are very similar to those which exist on DAWs such as logic. A basic Behringer distortion pedal can be used with Logic to bring some authentic, raw sounding distortion to low key electric guitars for bedroom pop or indie music.
EVH Phase 90
Phaser pedals are a great way of introducing weird sounds to your electronic music. Synths and other forms of sound modulation are great for creating tense and exciting electronic beats but missing out on the variety of other sounds out in the analogue world would be a mistake.
Phaser pedals are generally used with electric guitar for classic rock and roll sounds, especially in the 80s. With the current focus on retro and the vinyl revival, why not bring them to the present era by recording phased guitar and using it as a sample or synth patch for high-powered electropop.
Wah Pedals
Like the phaser, it may not occur to you to use retro sounding pedals in modern electronic music. Nevertheless, with enough production, a fuzz pedal or wah pedal can be used to add layers of depth to your electronic music.
With digital, bedroom-based production one thing which is lost is the warmth and depth of tone of analogue production. There is always a fine balance between creating depth or interesting sounds and keeping the crispness which makes electronic music so listenable.
A wah pedal can be used to create a wall of sound effect which is great for combining with mixed vocals and synth sounds for big choruses. Dunlop pedals are a great middle of the road brand for this as for a pedal you may use quite a lot but which needs to stand up to the wear and tear of production, they are not too expensive but still provide great sound. Try the cry baby pedal for big noises to mix down and combine with synths and electronic drums.
Ways to Combine ANALOG and DIGITAL MUSIC workflows
Dry Recording
It isn’t every guitarist’s first preference to record guitars dry into their interface and DAW, but for electronic musicians who are not bound by the conventions of rock history, it is a way to get subtle and low-key electric guitar sounds into otherwise electronic songs and have them still work, without sounding overpowering or like two completely disparate genres have been mashed together.
Try it and then layer FX to your choice over the top of them. The dry base can give you more options for creativity as you add different musical textures and ingredients.
Recording and then adding FX
Recording wet sounds such as by miking up amps can result in a rich sound which is not always desirable in electronic music as it can drown out the other elements. However, if you choose to record this way, good, pro level EQ plugins can allow you to mix to your liking and have the best of both worlds – the multiple tones and the appeal of real instruments, as well as the cleanness of electronic sound and the ability to manipulate sound to your liking to create bigger, punchier dynamics like pulsing EDM drums for a danceable pop song or the hazy atmosphere of dreamy bedroom pop by adding reverb and delay.
Digital and Analog Music – Conclusions
Combining analogue and digital sounds is as simple as using your gear creatively and making sure that you understand the contexts in which different sounds are used.
The Black Friday 2021 and Holiday Season 2021 sales are going insane right now. Soundcloud is the latest to join in and we will just keep this short: They are offering a whopping 50% discount off their Pro Unlimited package.
We know you wanted the Soundcloud Pro Badge for long, but at the usual rate some would find it just too expensive for what it offers. Well this is your lucky week! The offer ends on the 21st of November so you better hurry-up and click here to get 50% off!
It is worth noting that this offer is limited to first-time subscribers and to users returning to the service (last subscribed 14 November 2021 or earlyer)
If you like this Soundcloud Black Friday 2021 DISCOUNT, we recommend you always and regularly check out our category of Deals by clicking here – we regularly keep you updated with the best offers the market has to offer.
The Soundcloud Pro Unlimited package allows you to:
Unlock unlimited upload time (individual file size limitation is 4GB, individual track time limitation is 6 hours and 45 minutes)
Get paid fairly for your plays
Access advanced audience insights
Replace your track without losing its stats
Pin your favorite tracks
Plus, you get the benefits of the platform (included in the free package and in “Repost”:
Hello and welcome to our round-up of the best portable music studio gear in 2023, for producing electronic music on the go and also for live music shows. This list is by all means non-final, and will get updated when the market provides us studio-heads with more options. So if you want to go on the road, you found a nice spot that gives you inspiration or even if you don’t have a permanent place to stay, this one is for you.
In the latest update, we look at some new additions in a year that has been surprisingly fruitful for creative portable electronic music gear.
With innovations from Roland with the Roland S-1 and with Teenage Engineering’s much anticipated EP33 KO-II, we also have ome lesser known, up and coming brands such as Polyend, as well as the Liven Lo-Fi 12 from Japanese synth makers Sonicwear.
Below you will find only the greatest portable music production equipment, we bring you the best of the best and the second offer, so don’t expect an all inclusive 15-item list, just our own selection.
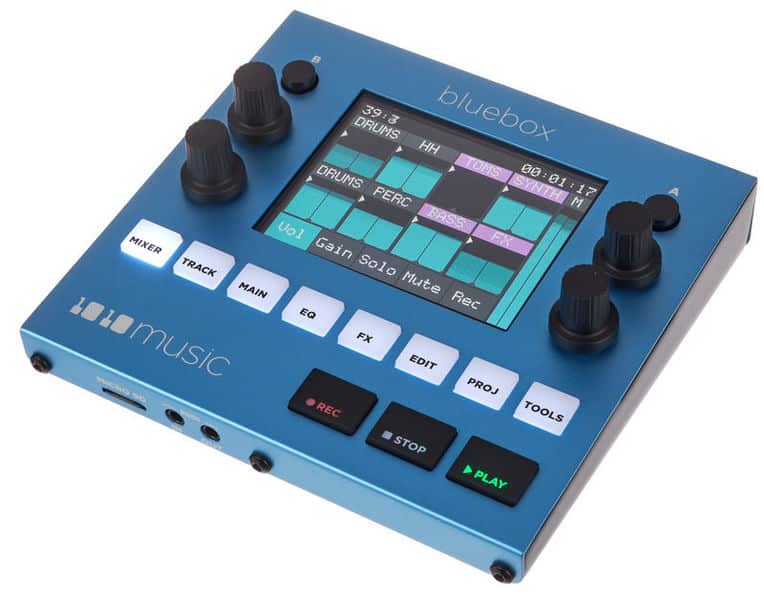
This one is a no-brainer basically. It is the most compact portable digital audio mixer in existence, and had a very good reception when it was introduced back in 2019. While the 1010music blackbox studio – compact sampling and mixing device does not have the hands on control of a traditional mixer, it packs in all the features.
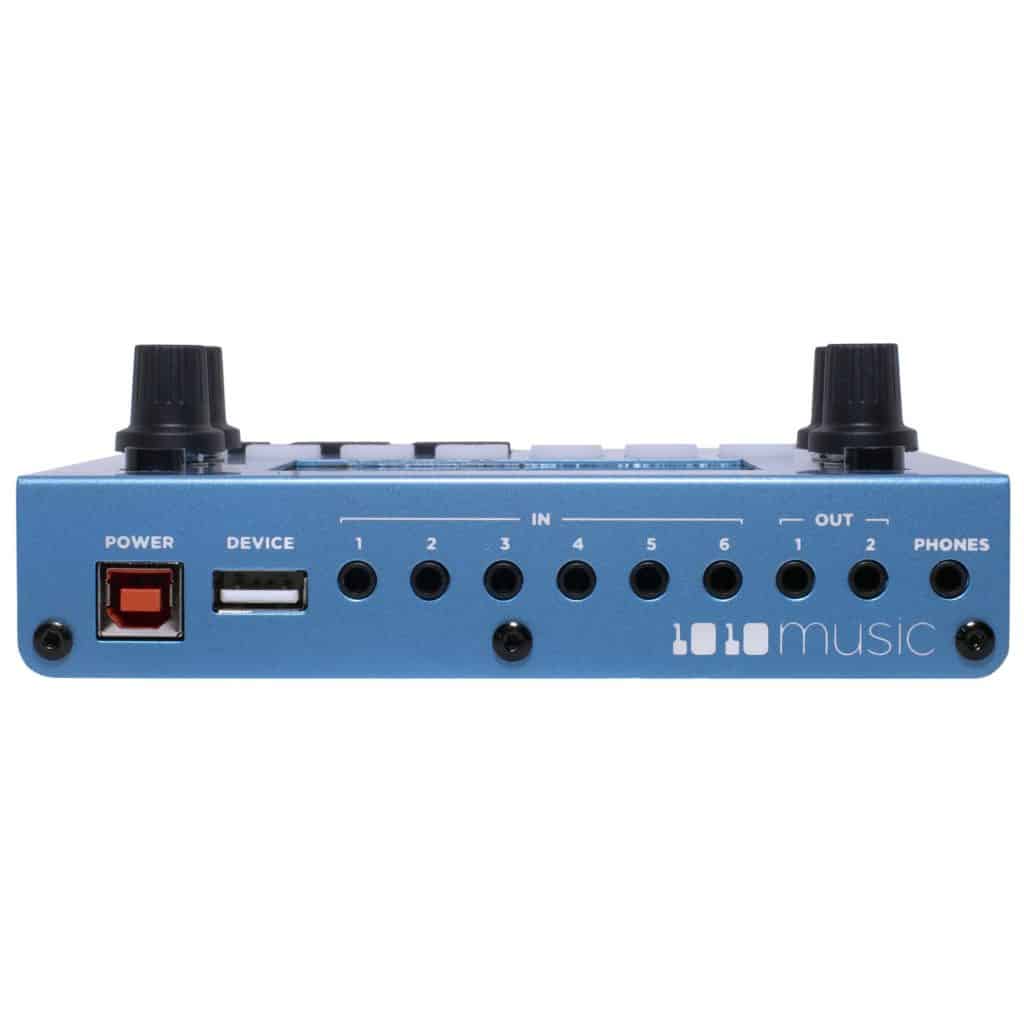
1010music bluebox provides 6 stereo 3.5 mm TRS inputs. Of course you are not going to get your studio-grade 16, 24 or 32 input mixing console, but if you are travelling, you will not be doing so with your full collection of synths to actually plug in to 24 audio channels. Yes you cannot do the smooth fader movements, often 3-4 at one time, but again going portable is all about compromises.
So yes, there is menu-diving and yes you rely on a touch screen for most of your work with this, but the size in unbeatable and the price is extremely good too. You can record everything on one or more micro-sd cards which is also a very nice feature as it can completely remove your laptop from your portable setup if this is what you want. If you are travelling on a plane and you are limited in weight of your luggage, it is excellent.
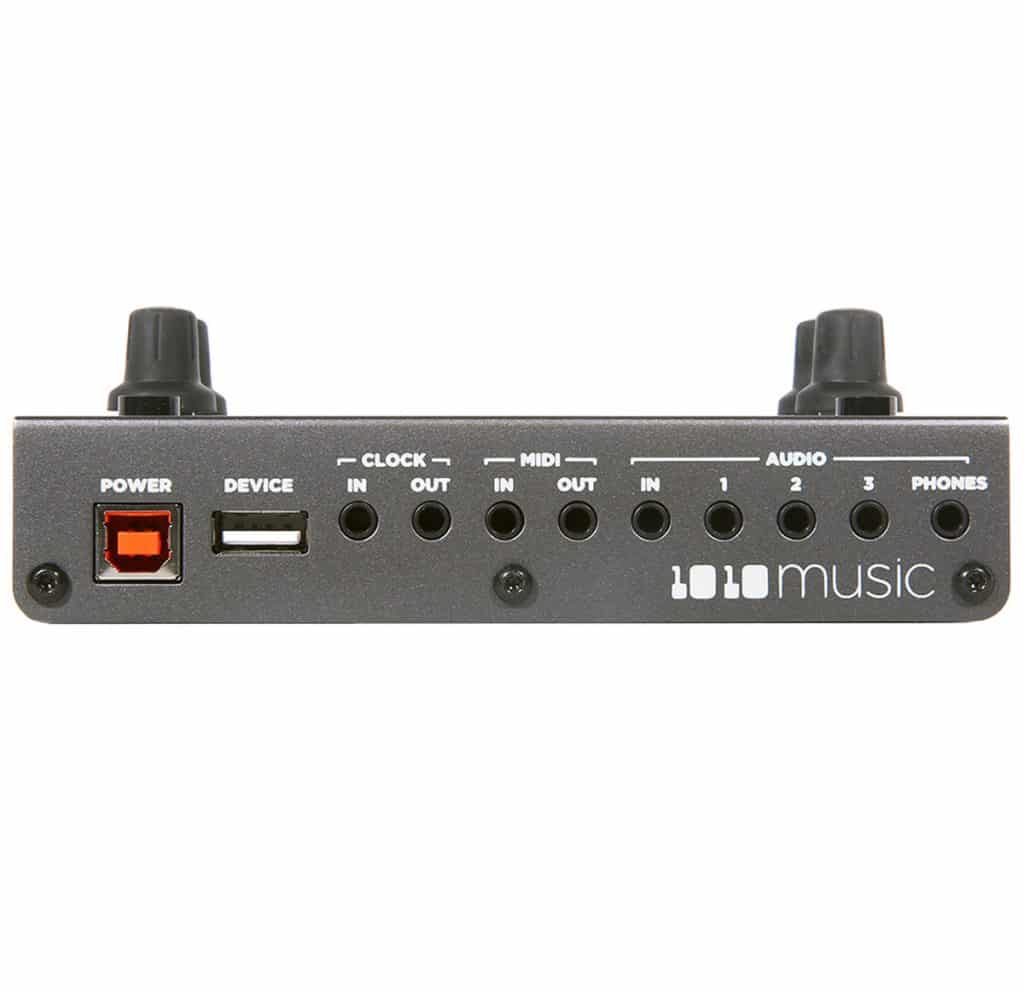
It also has two outputs plus headphones, so there is the option to have some outboard processing as well, as it has the option to create bus style routing. Overall, it can be the centre of you portable music studio or live act setup as it also comes equipped with MIDI I/O, a four-band EQ for each channel,
The Bluebox mixer supports USB power so it most definitely can run off an USB power bank, just make sure you get a name-brand one as the cheaper alternatives are not that stable and may end up frying your gear or just cutting the power without saving your work.
For live acts, it might not be the best weapon that you have as it lacks tactile speed of a normal mixing board. This one is more of a set-and-forget device, so you have to be aware of it’s shortcomings.
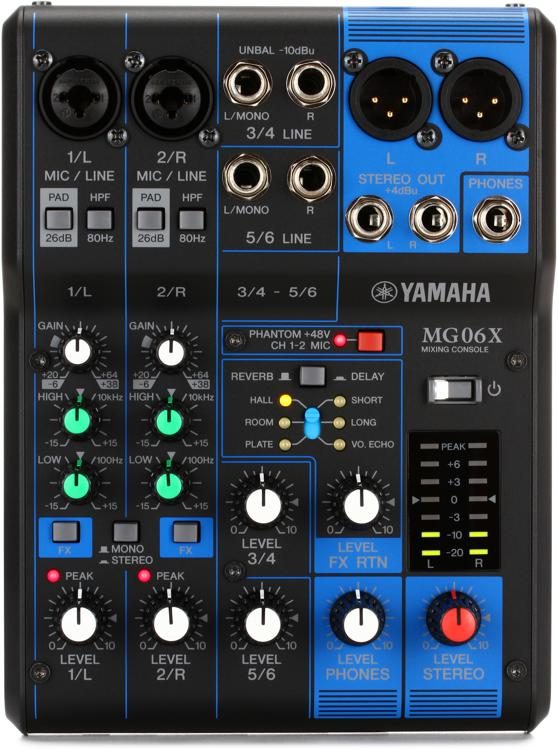
This portable music studio mixer is more for the old-school types that want to have a more hands on approach, and prefer to trade off some space for this (obviously). This Yamaha mixer does not have a screen, but it does have two microphone XLR connections with phantom power, plus two stereo/four mono inputs. It does not have the ability to record on external media, but it offers a metal rugged chassis and you can just use what recording device you can get including a sound card and a laptop; maybe take them from your fixed studio?
Yes while it has it’s drawbacks, it still boosts an extra compact layout and has some rather good built-in effects, two sets of (identical) outputs, phone outputs and high pass filter option on the inputs (to filter out the low 80hz frequencies). While 1010music are a newcomer to the game, Yamaha has been building studio gear for a long time, and knows its way around mixing equipment.
The inputs of the Yamaha MG06x are studio grade and other than the effects, the sound processing is fully analog. It is also good for the money you pay for it, and weight in at just about 2 pounds, it will fit into your bag without problems. Just don’t expect to run this thing off batteries, it will only work with mains level power.
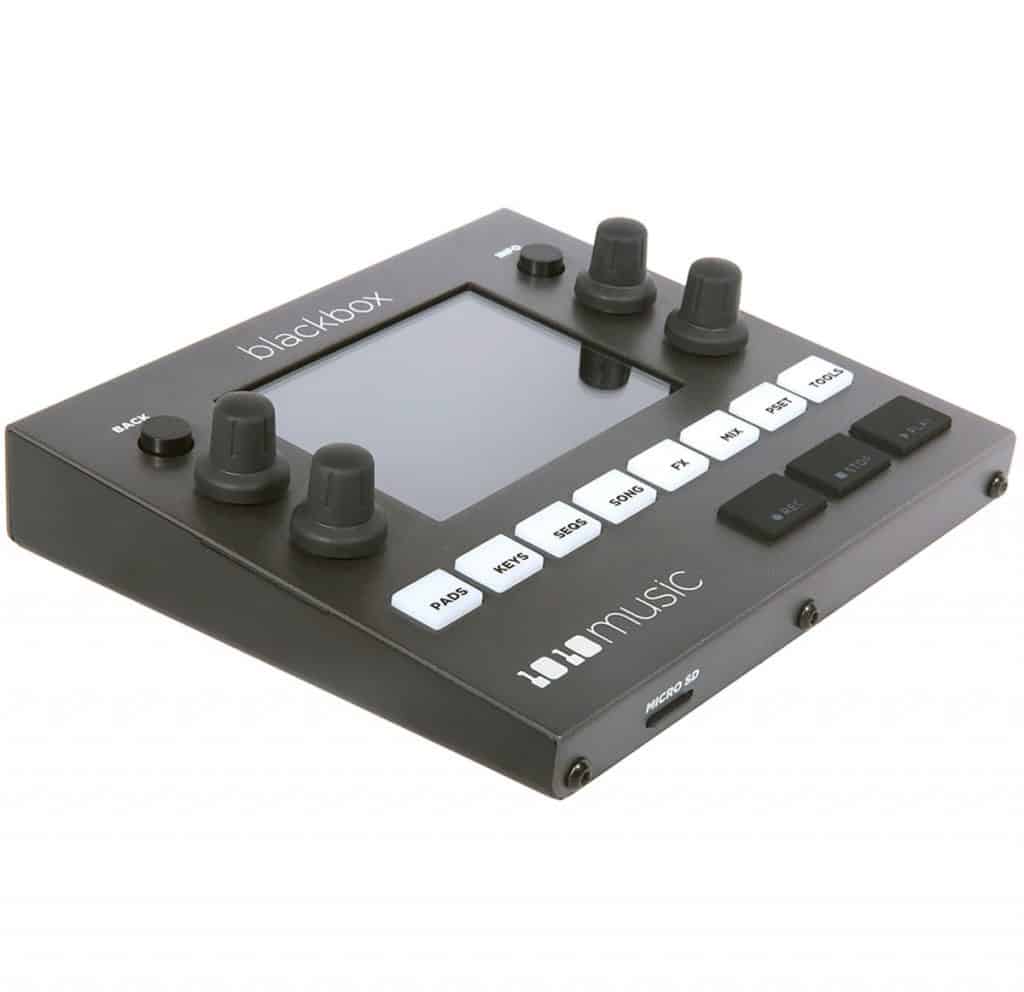
Again a piece of studio gear from 1010music, who specialises in very portable equipment. The blackbox is a very interesting sampler with extra features. It has a touchscreen that is both bright and generous (given the full unit size).
Again, the purpose is mostly to replace your computer as it features an arranger and song builder completely out of your samples, but you can also use it to capture performances on your $20.000+ synths that never leave the studio and just jam with what you recorded when out and about.
For that purpose it gets the job done with a bit of creativity to spare thanks to the internal effects and presets.. The 1010music blackbox also supports an SD card like the blue box and takes in both mono and stereo samples at 16, 24 and even 32bit. It has a 24 bit DAC so your recordings from the analog world will sound best.
Just like the Bluebox portable music studio mixer, the Blackbox sampler can run off an USB power bank, just make sure you get a good one that provides a stable voltage.
As i/o connectivity goes, you can put one stereo channel in and get three stereo channels out but don’t forget that you can internally mix these analog signals with the samples that are run internally (16 channels). It also supports 16-note polyphony and USB and TRS midi (you will need an adapter if you want to MIDI interface with other traditional 5-pin sockets).
So this portable music studio piece of equipment seems to tick all the boxes, but what it does not have is hands on approach. So while it is good for production, in a live show you might not really want this as it takes a bit of time to do significant changes to your sound and also because of the touchscreen interface, the control might be a bit wonky.
Ok, we can’t believe nobody has done this before. The tagline for what looks like a small piece of retro technology is ‘make an album on the go’. What the Tracker Mini is essentially, is a portable audio workstation. That means it includes a sequencer, sampling and sound design tools, a built in microphone, and all the other capacities you would need to create working versions of your ideas even when you are miles away from your studio.
Does it live up to what it promises? It’s very dependent on the individual, so if you’re a studio purist you probably won’t like this one. However, their site does have a section where you can hear albums made entirely with the Tracker Mini, and the interface, which essentially acts as a DAW, is not to be sniffed at, with all the functionality and simplicity of a less popular DAW like Reaper. We’re hoping to potentially go more in depth with this one soon, so watch this space. But for now, if you want to check out all its features, you can see them here on the Polyend website. However, remember that it doesn’t come cheap, at 699 EUR,and this is likely to be a highly in demand product. However, you can pre order from their same website.
While the previous sampler is considered by us the best, this is mostly because of the portability factor and also because most people use samplers more as sample players, and just changing the sample recorded from time to time without serious editing in real time.
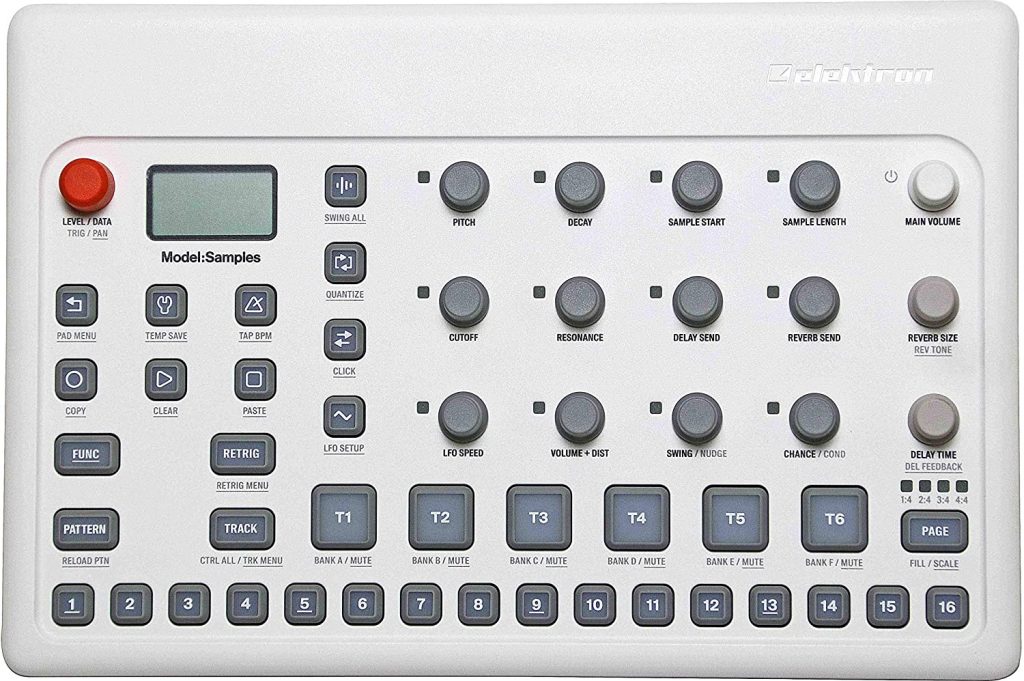
However, for those that want more control and are willing to sacrifice a bit of portability, there is the Elektron Model:Samples.
Yes we are huge Elektron fans here at idesignsound. These Swedish guys nailed it with their grooveboxes, their workflow is fun and their specialty is flexibility. With the exception of the mixer and effect category, Elektron are present with offerings on all portable music studio gear types presented in this article
The Elektron Model:Samples is considered a very entry-level way of getting familiar with the way that this company handles it’s workflow. Everyone will tell you that they have a bit of a learning curve and that they see things a bit differently. Some will even say that they tend to make user experiences that are overly complex, even for the most trivial of tasks. But we tend to disagree, as all things that they do, they do for flexibility and power.
It is clear to us that with the Model:Samples they tried a bit of simplification. They offer a lot of one-function-per-knob controls which is very rare these days, especially in compact gear. They seem to create a lot of space between these knobs so they are perfectly suited for live performances where you don’t really get great lighting and you may twist the wrong knob if the controls are very close to each other.
The features are great on this product, and we would like to firstly point out the sequencer. Yes, Elektron have probably the best and most powerful sequencing options in the game and have made this their most important trademark. You can record live, you can program changes of parameters in each step, you can have odd sequencing times and you can have probabilities and micro-timing settings too. This is basically standard for this company, and the Model:Samples makes no exception. Then, you have the six velocity sensitive pads to get finger drumming, the retrigger and the stereo effects, all very useful.
While the sampling and sound engine is limited, this is to be expected as the company offers more products with a higher price tag and better sampling features. Let’s remember that this is an entry level product and that sampling is mostly just sample playback.
Whilst we are big Elektron fans, we also do like to give the spotlight to lesser known companies. One of these is Japan’s Sonicwear, who are capitalising on the trend for LoFi music that doesn’t seem to be slowing any time soon.
They’re doing this with the Liven Lo-Fi 12 portable sampler and groovebox. If you’re looking for a synth that you can make beats with from scratch it may not be the best. However, this isn’t because it’s no good – instead, it specialises in one thing and does it really well, and you guessed it – that’s Lo-Fi.
Sonicwear claims that the Lo-Fi 12 ‘makes creating music fun’, well, most of you readers here will already think that it’s fun on its own merit. However, we do have to commend the Lo-Fi 12 for taking the Lo-Fi trend and running with it to the absolute limits.
The product video on their website even claims that it ‘turns everything into Lo-Fi’ and this is an accurate assessment, but you’d be forgiven for thinking that was the only gimmick.
Obvious if you don’t want a lofi sound, this synth won’t be any good. But within this, it has a retro 12 bit sampler, bitcrusher, reverb, delay, high pass and low pass filters, and so much more. Plus, the demo video shows that it’s remarkably versatile, even being able to create gritty jungle beats under a lo-fi veneer. Additionally, the ‘laid back’ knob creates ‘drunk’ sounding beats, a feature that we love for its creativity.
As it’s also released in v.2.1 this year, we felt it was a must include for a unique and portable sampler and groovebox that does something different. However, it doesn’t come cheap, at 239 USD.
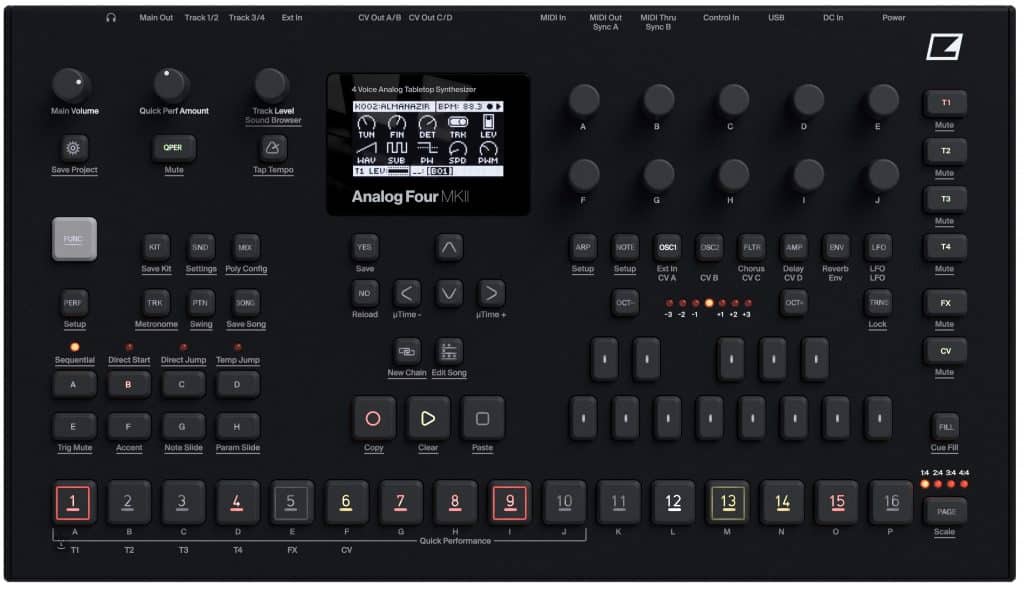
Best portable electronic music studio polyphonic synth: Elektron Analog4
Ok, now we get deep and dirty with the Elektron offerings. While the previous product we discussed, the Model:Samples was considered an over-simplification, the Analog4 ticks all the boxes of the Elektron not-so-beginner-friendly way. The Analog4 is an excellent sounding and extremely versatile synth. Most people swear by it in every live show, although some consider the oscillators and sound engine to be a little thin. We personally disagree, and we have alywas enjoyed the sound that you can get with an Analog4.
This is mostly because of the complex modulation routings possible with it (basically you can modulate every parameters of the synth) and the waveshaping possibilities (all oscillator wave types can have the pulse wave modulated). There is a very interesting trapezoid wave type, there is partial oscillator sync, there are a lot of envelope shapes to choose from and there is AM. The new MK2 version of the Elektron Analog4 has a redesigned outer shell, it looks very pretty but if you want extreme compactness, you should look for a used MK1 as they have the classic rectangle groovebox shape profile.
The 4 in Analog4 stands for the separate synth channels that this thing can output. This is called multi-timbrality. What this means is that while you are buying one single unit, it is capable of creating four individual and distinct sounds that can have their own sequences and their own modulations (albeit these four distinct channels will be monophonic meaning you can only play one note at a time)
If you don’y want four mono channels but actually need some polyphony, this thing can switch to four-note polyphonic play (so you can do chords with it). The voice routing is extremely flexible and you can have eveything in between (two mono channels, one 2-note poly) including four note unison.
The sequencer on the Analog4 is state of the art, with every possible creative trick at your disposal. There is a lot spoken about the Elektron sequencer, it being an entire subject on its own, so it is important that you actually research this if you plan on buying this product. What is important to say si that with the most recent patches applied, you can even send the sequencer notes via MIDI to other gear and have the Analog4 as a midi brain, sending notes to the other compact equipment that does not have a means of inputting notes.
There are three stereo effects on board this beast, and there are also two audio inputs so you can use these effects for your other sound generators. The delay shines and you can sync it via MIDI too. Speaking of audio inputs, the Analog4 can even work as a sound card via USB, getting two mono channels of sound in your computer or getting two mono channels of sound from your computer in the analog realm. The converters on this are 48khz-24bit.
Oh, and if the Analog4 is up to your taste but not your budget, you can also check the Elektron Digitone – not analog, more compact, more cheap. We will write a review soon!
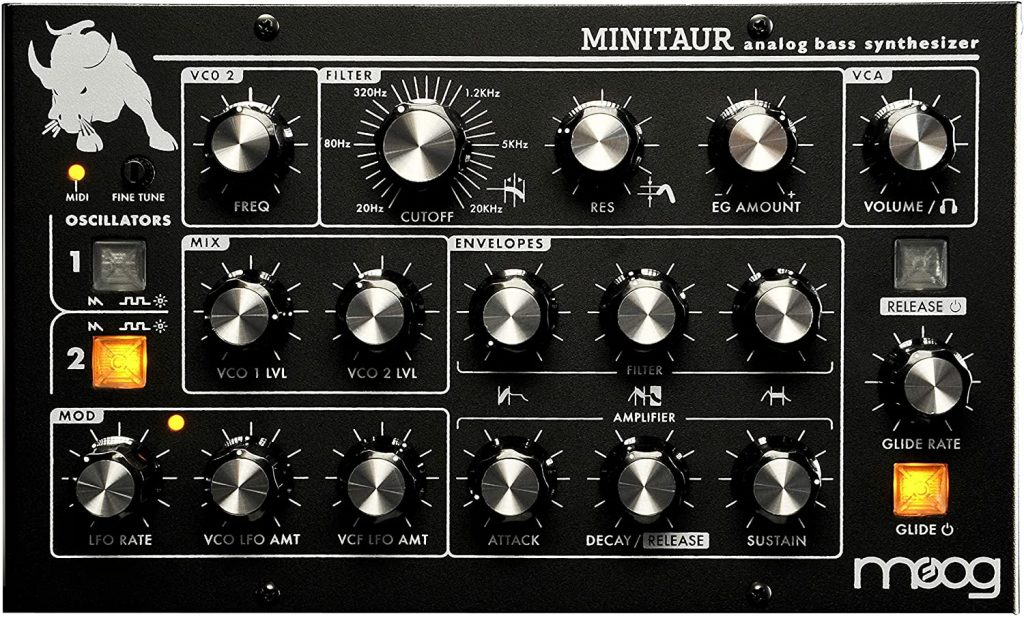
So for those of you that were a bit intimidated by the Analog 4, there is a much more streamlined option: the Moog Minitaur.
Sure, the first thing you will loose is features like a sequencer, polyphony, midi output, sound card features, modulation matrix, pulse width modulation, FM/AM modulation. Now that we got that out of our heads, the Minitaur is the easy way into the Moog Sound. And boy what a sound that is. if you are into bass-heavy music, you can’t go wrong with it. They even call it a “bass” synthesiser, but that is mostly because of the limited feature set.
What you actually get is a two oscillator one lfo synth. The wave shapes are limited; pulse or triangle and there is no way of modulating anything other than the pitch and filter. You do get two ADR/ADS envelopes, glide/portamento and an audio in for either plugging in external gear through the filter and envelopes or (more commonly) creating a feedback loop to thicken the sound.
Although by using a computer and the control VST you will get some added features including a preset management library, in a portable setup that can or can not be achieved. It all depends if you use a computer or not.
Although the computer brings in more flexibility (and midi – USB), we still think that the Minitaur is made to be tweaked-upon. The sound is lush and the filter is what you expect from a Moog.
We have another blast from the past with the Roland S-1, a new portable synth that is modelled on the legendary Roland SH-101. This portable polysynth uses modernistic features such as wave manipulation and onboard sequencing. It also has unique options like oscillator chop, which use technology for newer than ever sounds. Ultimately, it’s super portable, and a great mixture of old and new. Billed as a tweak synth, we think this one is all about the ability to sculpt, shape, design, and pus the boundaries of music. Check it out on their website here.
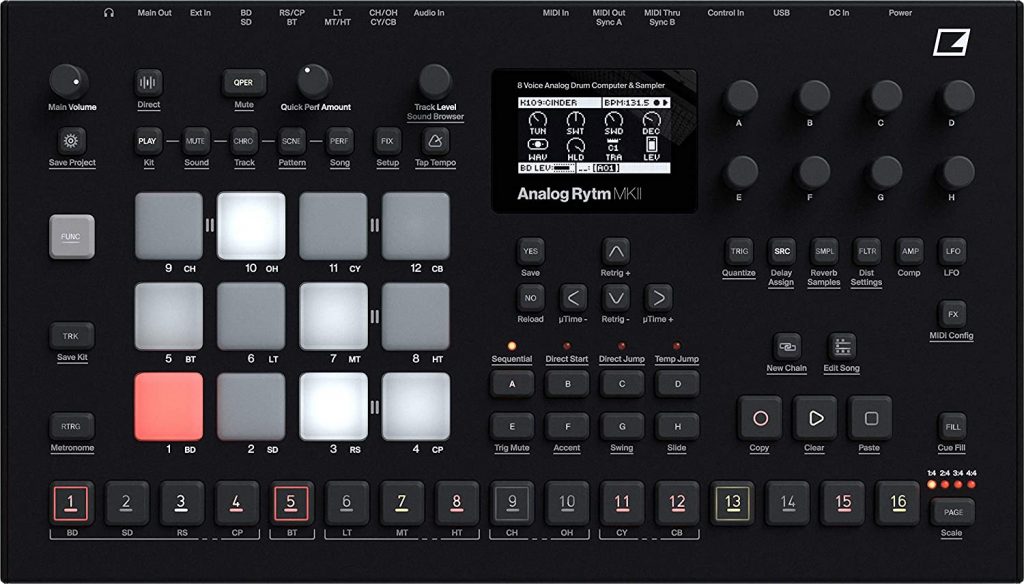
As we said, we are big Elektron fans. Elektron Analog Rytm MK2 is made to be paired with the Analog4 and is Elektron’s take on drum machine, and also a successor to the highly sought-after digital drum machine from the previous generation: the Elektron Machinedrum.
What you get with the Analog Rytm is: basically everything.
You want to do finger drumming like on the MPC – you got it!
You want to use samples – you got it!
You want analog drums – you got it!
You want to modulate as much as possible – you got it!
You want to control other gear with the sequencer and midi – you got it!
You want to output individual tracks – you got it!
You want to process external sounds in each of the total eight tracks – you got it!
Coming it with it’s distinctive sequecing power, individual step settings (p-locks) and all the workflow improvements that this company is known for, the Analog Rytm is an eight-track monster packed in a very compact format.
The sounds it’s analog engine make are world class, you can hear it in most modern productions and if you still don’t like them, you can switch to your own samples without issues. You can even mix both in a single drum kit.
Drum machines are, in our honest oppinion more simpler than synths, so there is not much we can cover about them, the sounds you can either love or hate but the workflow, once you get used to it, will raise your standards for life.
If you would rather have something even more compact and more affordable than the Rytm, while still keeping true to the Elektron workflow, you should check out the Elektron Digitakt.
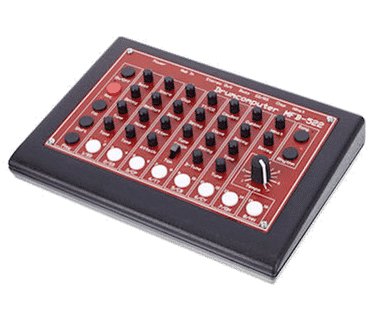
MFB-522 portable drum machine
Yes this is a classic and yes this is discontinued for a long time. Yes this is an 808-clone. But it is by far one of the most compact drum machines ever.
While really very simple and very hard to use, especially if you have big fingers, we still felt the need to mention this tiny piece of 100% analog gear. We just love it.
Yes we love it’s weight and it’s color scheme. We love that it has four outputs given it’s size and that you can really get some punchy sounds out of it. The hi-hats choke, and the kick bounces.
Just throw it in your bag, purse or even your pocket (this thing is tiny) for some instant 808.
What we don’t like is the sequencer. You really should not fiddle with the 522 during a live show, but for a portable music studio you really can’t go wrong.
You can find the 522 on the used market, however in recent times it’s becoming a rare sighting. You can check Reverb by clicking here.
The Teenage Engineering EP 33 KO II
And, we’ve saved this one for last because of how exciting it is. Finally, we have a successor to the Teenage Engineering PO 33-KO. With PO standing for pocket operator, it’s pretty obvious that this sampler is super portable. Essentially, the biggest thing about the update is a reworking of the sequencer.
But we have to give this one a mention just because we love the innovation of Teenage Engineering products anyway.
What is has:
Ability to sequence your samples, loops, and beat
Tons of great pre-loaded stuff with the classic Teenage Engineering high sound quality
A hadheld, portable sampler and sequencer that lets you take in the sonic environment around you and play it back in whatever form captures your imagination.
We can’t go into the full details of every great sampler and piece of gear in one article, but we definitely think this is one of the most anticipatory new pieces of portable gear this year. You can check it out on their website here.
Portable Music Studio Gear: Honorable Mentions
Here we will put other compact studio gear with some notes, they are good just not the go-to for us so they did not have their own article sub-section.
Akai MPC Live II is a very portable MPC type device, which does not need any introduction.
Korg Volcas, compact general purpose devices, including drums, synths, FM, even modular and sampler options.
Conclusion
While the portalble music studio equipment landscape is as dynamic as ever, nothing will be able to replace the laptop or even an eurorack modular setup in terms of flexibility. This is why we did not bother to go into effects, because these tend to be one trick ponies and it’s a good idea to actually add effects in the digital realm. We have a great article about using analog effects right here, if you are interested. Most hardware effect units are actually digital inside so the whole analog vs digital battle does not apply to them. There is also something magic when you max in the digital realm and use a laptop, or max the opposite, analog spectrum and get a very multipurpose eurorack module selection. These are maximums for compactness that also allow you maximum flexibility and the most efficient storage space management possible.
While we did make a point into not discussing these two tools – modular and laptops, having a portable music studio for both production and live performances is extremely fun and inspiring. Just breathe in that fresh mountain air and sport a nice solar panel to recharge your batteries (you should have multiple packs of them), while you make your own flavour of music and soak all the inspiration that the outdoors can provide!
These days, you don’t need to be signed to a label to create and release your own music album. Whether you’ve got a few select tracks for an EP or enough music to lay down a full-length album, you can create your own masterpiece and release it to the masses. To get started, take a look at this step-by-step guide on how to produce, design and launch a music album:
1. Create and Select Content
If you’re releasing original music, you’ll need to write it before you can set about creating your album! Writing your own songs can take a significant amount of time but, if you’re passionate about creating music, this might be something you’ve been working on for months or years. If you’ve got this far, you may already have some tracks that are ready to go, but take the time to figure out whether they should be included on your album.
Typically, artists use an album as an opportunity to send a message or make a statement. Not all of your songs will necessarily work well together, which may indicate that they’re best featured on different albums. In the same way that you’d craft a set list, listen back to your tracks and decide which ones should be featured on your next album.
2. Perfect Your Performance
When people listen to your album, you’ll want to ensure that the audio and performance is of the highest quality. As every musician and singer knows, there’s no substitute for rehearsals. Dedicate as much time as possible to rehearsing ahead of recording your tracks for your album. The extra effort you put in will elevate your album and could have a considerable impact on your future music career.
Of course, rehearsing in the right environment is always important, so don’t settle for practicing at home. With band rehearsal space, you can access the equipment and acoustics you need to hone your performance. Some quick research will help you pinpoint the spaces available in your area. For instance, if you want to find band space in Dallas, take a look at Pirate’s Dallas rehearsal studios. Featuring drum kits, guitar amps and mics, you’ll find acoustically-treated rehearsal spaces that cater for up to six people and affordable hourly rates that allow you to rehearse to your heart’s content.
3. Find or Hire Session Musicians
Unless you’re a member of a band, you might need to work with session musicians when recording your album. These talented pros will play your music and provide the backing you need as you perform. Of course, modern technology means you can actually play every instrument yourself, if you choose to. However, if you don’t have the skills to play every instrument, working with session musicians can be an easy and effective way to complete your album. Use local industry listings or network contacts to find the right team to support you as you record and release your album.
4. Start Recording
Artists rarely record a track in one take, so don’t expect recording your album to be done in just an hour or two. Instead, you’ll want to record parts individually and listen to them back before mixing them together. This allows you to modify the sound and create the best final edit. In many cases, you’ll want to re-record parts after you’ve mixed them, so be sure to leave yourself enough time to head back into the studio.
While some artists use at-home equipment to record, this can be tricky to do in reality. Unless you have a purpose-built studio at home, noise disturbances or poor acoustics can have an impact on the quality of your album. What’s more, hiring a professional studio for a limited time can be a lot more cost-effective than investing in your own industry-grade equipment!
5. Post-Production and Mastering
Once you’ve recorded your album and you’re happy with the mixes, it’s time to enter the post-production phase of producing your own album. Although you can use professional software to do this yourself, working with an established mastering house is often the best bet. With their input and expertise, your tracks can be elevated and enhanced. In addition to this, getting your tracks featured on the radio or purchased by video producers is always easier when they’ve been professionally mastered, so it’s worth bearing this in mind.
6. Designing the Artwork
When you’re releasing an album, your primary focus will be the quality of the audio, but don’t overlook the importance of the artwork. You’ll need to reflect your personality as an artist and the content of the album, as well as engaging your target demographic.
There is a variety of software you can use to design your own album cover but getting expert help with the artwork may be beneficial. As well as including imagery, you’ll need to consider who needs to be recognized as a contributor and include any relevant legal information. Of course, you’ll also want someone to proofread the text before you approve the final version!
7. Promoting Your Album
Ideally, promotional activities should start well before your album is launched. However, you’ll need to have a clear timeline and be confident about hitting your deadline if you’re going to start promoting it in advance.
As well as featuring your album on your own website, submitting it to audio streaming sites can help you to reach a larger audience. Similarly, putting your music forward for inclusion on playlists can be a great way to attract more listeners. In addition to this, you can use online, local and even national marketing strategies to generate publicity. From reviews in industry publications to guest spots on podcasts, there are numerous ways that you can promote your music and acquire new fans.
Are You Ready to Make an Album?
Many budding musicians feel apprehensive about making an album, but there’s no need to be put off. With access to the technical equipment you need and support from industry professionals, you can begin laying down tracks, recording your set list and promoting your album any
Ok, sometimes you may want the best plugins out there but your budget doesn’t quite cut it. Especially with popular plugins like the Serum synthesizer, you may want to know your other options. We have broken down some of the BEST free alternatives to the MOST POPULAR paid-for plugins.
We offer you RC-20 free alternatives, ANTARES free alternatives, free alternatives for Effectrix, and more. Yes, ladies and gentlemen, for today iDesignSound.com will bring you our own favorite free alternative vst plugins to the most popular digital music production tools on the market.
Sure, VSTs are great, and VSTs are usually much cheaper than actual hardware music production tools. Still, when it comes to digital products, there will always be a free option. To some analog purists, digital does have its downsides. But it’s in cases like this that it really has its benefits, too.
This is because digital is literally, well, digital meaning without physical form. This means that once some effort has been put into development, copying and distributing the product can be free of charge. This has in turn provided never before seen accessibility and democratisation of the music landscape.
Now, all you need to make music is basically talent, a (fairly cheap) computer and your DAW of choice (which can also be free, of course). Let’s dive straight in and see what’s on “offer” – plus we have added some new options as of 2024 due to there being marginally more choice and variety on the market now.
Thus, finding an alternative is a bit hard, but it is possible. Without further ado, we present the closest match in the free vst market for a Serum replacement: Vital. It comes pretty close in terms of power and sound quality, albeit it does have some bugs.
Back when we wrote this article in 2021, Surge XT had not yet gained all it’s accolades. However, this free Serum alternative has a huge variety of synths and quickly became very popular for good reason. While Vital still stands as one of the most established alternatives on the market, Surge XT is a close and creative competitor that’s worth investigating if you want more options.
One of the downsides is it is only available for MacOS. On the plus side, it gets pretty creative with its offerings, such as MPE, and microtuning.
Step into the world of sequenced effect units. These are a great addition to your home studio because they apply effects only to certain parts of your sound, and you control which part you want to modify with a simple and known interface. The resemblance is not there, but trust us, it is basically the same thing. The effects are on par in sound quality, and there is even a randomiser on board for those that like to experiment.
Glitch is available free of charge here. Glitch is still by and large the best and only free Effectrix alternative out there on the market. However, we’d be lying if we said it was the ONLY viable option for low-budget musicians.
Did you know that FL Studio’s Effector feature can also act as a POWERFUL EFFECTRIX ALTERNATIVE, free of charge if you already have FL Studio?
Sometimes, all you need is a bit of creativity and resourcefulness.
RC-20 Retro Color free alternative vst: Izotope Vinyl
This is one of our favorites. It is soo simple to use and the results are extremely good. What we like about Izotope Vinyl that is comparable to RC 20 VST is the instant gratification element. You just slide a little fader and the sound takes so much color and character, a smile is guaranteed to appear on your face.
Sure, the graphical user interface is extremely spartan compared to the RC2o plugin but who cares, as long as the results are comparable. And they most certainly are. You even have the wobble from RC-20, represented on Izotope Vinyl as the “warp” control, with the added bonus of actually controlling the warp shape. On the RC-20 there is the “Digital” and “Distort” control which is basically a bit reduction and a form of distortion that can be replicated in any daw with built in effects, it’s really nothing special.
If you really must have a 3rd party VST alternative, any distortion and bit reduction plugin works. Also, the “Space” control on the RC-20 is just a normal reverb, there are a lot of free reverb options out there. If you don’t know any free reverb, bit reduction and distortion plugin, let us point you in the right direction with this free vst mega list.
As of recently, the popularity of vintage and analog effects has dramatically increased. Depending on how faithfully you want a plugin that replicates the RC-20, there are a host of other vintage FX out there FOR FREE beyond just using the effects in your DAW. We can’t share them all, but one we would like to highlight is Superfly DSP’s Lost Vinyl plugin.
Whilst it may not be precisely as similar sounding as RC-20, it does do a superb job at giving you a range of ways to reproduce those vintage sounds and imperfections that fall under the name ‘lo-fi’.
Otherwise, we hope this section gives you a bit of an overview as to how you can replicate this sound in a variety of ways. Although they may not have the qualities that earned Izotope its fans, they do at a pinch – and in some ways have their own charm.
Guitar Rig alternative: Amplitube
Well, kind of. Yes, Amplitube is a paid/licensed piece of software that has a free-of-charge version. Guitar rig also has a free version, a demo mode. Still, we consider that Amplitube is a good contender if you want to find a Guitar Rig replacement that is also free of charge. We decided to do a whole article on comparing Amplitube to Guitar Rig here.
Why do we also list this? This is because Amplitube Custom Shop, while not free, gives you more flexibility in your investment into plugins through its credit system. Another low-cost option is the rent-to-own model which many plugin manufacturers have now adopted. Again, whilst not free, it offers you a cheaper price and more flexibility with the same number of options as big FX bundles like Guitar Rig and Amplitube.
Antares Autotune free replacement: Graillon 2
Ah Auto-tune, the effect we really love to hate here at iDesignSound. That is because we consider ourselves serious music makers who don’t really like pop and the pop sound that you can find in basically all mainstream music including a lot of hip hop.
Still, if you must use it, there is really no point in getting a paid plugin unless you really really need all the very pro features, But if you just want to tune vocals without ruining the sound qualities then the alternative vst called Graillon 2 will work just fine, and you can find the free version here.
That was it, we hope we managed to make your music production journey a bit more budget-friendly. Still, if you want to use the paid plugins like a pro, sign up to our newsletter. We always provide our subscribers the best deals on the market!
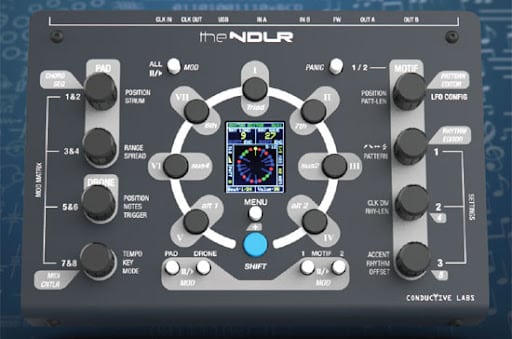
So we have had this excellent Conductive Labs NDLR sequencer, or how we like to call it: the midi “brain” for quite some time now. And boy what a brain this is.
We have been comparing it a lot to the Torso T-1 sequencer (review coming very soon). It is different but not quite that different. As loopop said in it’s video, the NDLR is quite unique. Traditional sequencers allow you to input notes fast on a grid type structure. In turn, they allow you to listed to the idea that you have laid down pretty fast, and judge A. it’s own musical qualities and specifics and B. how it sits along with the rest of your tracks. Thus, sequencers are a very powerful creative tool, most of us techno and minimal heads consider them the centre of our creative process (mostly because we can’t be bother to take the proper time to learn to play keys properly).
Traditional sequencers vary in complexity and flexibility, from the very primitive ones that can be found in groove-boxes (like the old Roland drum machines and Korg volca line) to very sophisticated ones that can allow you to program velocity, note length, probability and all the other parameters that can be tweaked on that specific piece of gear (think Elektron with it’s parameter locks). At the top of the line of traditional, note-input sequencers is the Cirklon, which is a dedicated step sequencer that can do all kinds of fast, creative tweaks and has a great workflow that most producers swear by. Let’s not forget software, basically all DAWs have a sequencer, be it direct like fruity loops or a piano roll (which is a two-dimensional sequencer, with time and pitch in the same screen). Also, pad-style instruments like the Ableton Push and Novation Launchpad can be configred so that the pads work as a sequencer.
Conductive Labs NDLR: a non-traditional midi sequencer
Now, let’s move it up a bit. We talked about the traditional sequencer, what they all have in common is that they always start with a blank slate, a noteless sequence of 16 steps (usually). You place notes there in the order and pitch that you desire and you can instantly hear how that ‘sequence’ sounds. You can ajust the notes and hear changes, so you immediately get a feel for where you want to take the melody of drum tracks of your music.
Non-traditional sequencers differ because you usually input the ideas and the midi hardware takes care of the notes. For the NDLR, you input the key, the degree and if we are talking about chords, the type of chord that you want and it spits the notes on it’s own. There is swing of course (called “Humanization”) and there is velocity. For monophonic melodies, there are two aspects that contribute the most to your notes: the patter and the rhythm.
Conductive Labs NDLR: Motifs
So the way sequencers work is that they create a rhythmic pattern for your sound generators. With the NDLR midi sequencer you get two dimensions to control this: pattern and rhythm. The pattern controls the notes, or pitch of each step in the sequence. There are three types of patterns: scale, chord and chromatic. The values that each pattern step takes indicates the note in an imaginary piano roll: chromatic is in absolute terms, not keeping any scale, scale limits the values to notes in the selected scale and chord is like scale, functioning with limited note choices but also makes the notes relative to the degree of the chord that you choose from the main panel.
Rhythm is similar to pattern but the value per step actually indicates velocity. You can create ties and rests here. For both rhythm and pattern you can select clock division and total length, separately from each other to get extremely interesting sequences.
The way that NDLR presents the sequence pattern and rhythm that you chose this is truly unique. Instead of providing you with a blank slate for rhythm and pattern settings, it always provides you with a filled sequence. This is so you can get grooving A.S.A.P. There are 20 presets and 20 user generated rhythms and patterns. To mark the departure from traditional sequencers (which present the sequence is a straight line), NDLR shows the pattern and rhythm as a circle, going clockwise.
This is just a slight scratch on the surface for what NDLR can do. The way described above is called Motif in NDLR, and represents the monophonic sequence way. Other than Motifs (which NDLR has two independent ones), this midi sequencer can output two more midi sequences, which are polyphonic and independent.
The way it works is very simple, you just select the rhythm, pattern, the way you want it to be played (left to right, right to left, random 1, random 2), clock division, etc and just press play. The sequencer takes care of all the note placements, so you can start tweaking in real time.
Conductive Labs NDLR: Drone and Pad
While Motifs are the core aspect of the NDLR Midi sequencer and the most flexible parts that this tool has to offer, they are monophonic. We like monophonic sequences but there is much more composition possible than this. NDLR has two poly modes as well: Drone and Pad.
Drone is a very basic form of note generation. It can be polyphonic but also in mono. What it does is play the root note of the scale that you selected, and if you want, you can add a 5th interval, and then you can add an octave on top. It has a simpler rhythm section than Motifs, but it is there in case you want to go a bit deeper.
Pad mode is for chords. You have a bit more flexibility than Drone and also you can select which chord you want NDLR to play. You do this with the circle of buttons that is close to the centre screen. With the same buttons you select the degree of chord in that scale as well as the type of chord you want to play. This is especially useful for producers that do not know music theory. You can instantly listen to any chord progression that you want, with pushing a minimal number of buttons. You can have the option to strum the chord, playing each note with a small delay so that they individually stand out.
We said Pad mode is a bit more complicated than Drone. This is in part because you can set up the voicing by using some presets that in NDLR talk are called “spread”. There are a lot of spread types, and we fully encourage you to explore them as they can lead to extremely interesting harmony. You can also select the number of notes in the chord, which goes pretty high if your synth has the proper polyphony.
NOTE: There is no rhythm section for Pad mode, The Conductive Labs NDLR midi sequencer sustains the chord for as long as you don’t press the chord type/degree button. If you want to trigger the same chord again, press the same degree button.
For an in-depth feature and usability review, we recommend this excellent loopop video. It is from an earlier firmware version, but still pretty much on-spot:
very in-depth Conductive Labs NDLR review
Extra modulations and MIDI I/O
This Midi sequencer has a lot of modulation options, you can use a multitude of sources to modify any parameter that you want. There are LFOs and Randomisers as sources, and they can be synced to time as beat divisions or actual seconds. There are four modulation busses, so the possibilities are virtually endless.
As far as Midi I/O goes, the offering is diverse. You have four channels on midi USB mode. Then you have two midi ins and two midi outs. You can configure each NDLR output to your preference. There is no power connection and on-off switch, NDLR gets power from the USB.
Overall, this little piece of gear has become the centre of my midi synths, the ones that don’t have a sequencer. It is flexible and it is fast, with extreme ideas flowing extremely fast. There is always a melodical touch to what it outputs and I really can’t part ways with it, nor can I see myself doing this in the foreseeable future.
So you are starting your channel and are in the market for the BEST Microphone for Podcasts and Youtube. Starting your own media outlet feels very nice, but not having the best gear can really ruin your day. Follow us further and we will guide you to get the best gear for your needs, without breaking the bank.
Editor’s note: This list is always updated to always reflect the status of the market, so make sure you bookmark it and come back for your future purchases.
You are going to need a couple of things, a good microphone, a great microphone arm, a sound card and a good computer that allows you to also record video on top of your microphone and voice. You should never overlook the basic stuff, like cables, internet connection and software.
The best thing about microphones for podcasts and youtube is that there are a lot of choices for you in the market right now. This niche is no longer narrow and expensive, and there are even some microphones that run on USB so you don’t need a sound card. We picked a winner for best performance and one for best value. Both our winners only have the USB audio option, so if you want a better sounding piece of hardware, be prepared to also pay for a sound card. If you are on a laptop and prefer to be on the move, then get an USB-only microphone as the value is extremely good.
Note: if you are on a mobile device, scroll left and right in the table to see all the entries, and up and down in the cells to see all the content.
Microphone for Podcasts and Youtube – market overview
Over the last few years or so, we’ve seen the rise of famous YouTubers and it seems that many other people are trying their luck in this field. They, or at least the ones that aspire for greatness should be using good microphones in order to sound great, especially on headphones where a bad quality microphone can simply ruin the viewer’s overall experience. Especially true for podcasts and content where only the voice is heard.
We have rounded up our own little Top 5 of aspiring products for the title of BEST Microphone for Podcasts and Youtube. We have a varied selection, ranging in the 50$ to 300$, and all products can be found on amazon.com. Our overall winner is a flexible, trusted solution that sends audio signal straight to the computer via USB. If you want more sound quality though, you will have to go with an XLR connection and a sound card. But if you are travelling for interviews or just don’t have the space, an USB connection only microphone could be more attractive.
Luckily, we have an article on the BEST Sound card for Podcasts and Youtube here.
After much deliberating, we’ve decided to award the title of BEST Microphone for Podcasts and Youtube to the Blue Yeti USB Microphone. Yes, you will say that it is standard but it is there for a reason. We like the Blue Yeti product because it has USB audio, so you get to cut a lot of the costs associated with your podcast or youtube channel, that is has a very small footprint and that you don’t need a stand for it.
The microphone is extremely easy to use and sounds great because of the three condenser capsules it has. The microphone just sits neatly on your desk and captures your voice in good isolation. But if you also want to capture some background sound for any reason, you can have it do this as-well due to the shape selection switch.
This microphone has four mic type patterns, depending on the way you want it to capture sound: Cardioid, Omni, Figure-8 and Stereo. Cardioid is recommended for just recording your voice, but if you want to delve deeper or require also ambient sound or effects, you can use it to capture more with ease.
This is somewhat of a cheaper product if you don’t feel like investing a lot of capital in great microphone right away, and want to try the waters first and see if you like doing podcasts or Youtube content. The Blue Snowball is the younger, smaller brother of the Yeti microphone as both products are made by same company.
Again, we have an USB-only audio connection. Fitting for simple setups, with limited budgets. Unfortunately, the DAC (the component that translates analog sound vibrating through the air into digital signal for your computer to process) is integrated into this cheap microphone. You don’t have the option to upgrade the DAC like you would a sound card so you are stuck with average sound quality.
Just like the Blue Yeti USB Microphone, the Snowball also has a selection of geometric modes, but sadly the “stere” one is missing. And if lighting is your thing, you can choose from up to six color styles with the brushed aluminium variant. If you don’t want vibrant coloring and are going for a more professional, refrained look, try the “Textured White” or “Gloss Black” finish.
XLR connection vs. USB connection
And now we would like to move to the professional segment. These microphones require a sound card with an XLR socket to function, they also require phantom power (supplied by the sound card). But having these things means actually means that there is more space in the microphone for actual sound components.
XLR connected Microphones for Podcasts and Youtube are always a better choice than USB ones.
This is because instead of having a DAC and a power supply built in (so it can take power and send direct digital messages to USB), they offload this task to the sound card so that they can pack a much better sound quality puch.
The downside is that you also need something to plug them into via XLR connection. This secondary device captures the analog sound signal from the microphone and transforms it into digital data for the computer to read. That is what the sound card does, and this is why you pay for it.
XLR connected Microphones and their soundcards cost way more than the USB option.
Still, these types of content creation microphones are very relevant to those that need sound quality, especially if you also create sound that is not voice based for your content and thus use instruments that you plug into your sound card as-well.
This one is the first XLR product on our list. It represents a mid-range condenser microphone pretty well. We would always recommend this one as an entry level XLR microphone because it will introduce you pretty well to the dynamic nature of voice recordings. You will be able to sound more dramatic or more mellow depending on your content.
For this market segment we decided to award the Audio Tehnica AT2020 the title of BEST Value XLR Microphone for Podcasts and Youtube.
The battle was with another Audio Tehnica product that is a bit more expensive, the AT2035. We have a whole article about the AT2035 vs AT2020 them here. The article also explains the XLR standard to some extent, so you can understand analog sound specifications.
This one marks the entry into the high end market space. If you are here, you know what you want and you can specify it. The Shure MV7 is a mixed connection type microphone, it will take USB or XLR depending on your label.
It is fully advised that you if you can spare the money and don’t have a sound-card yet, get the Shure MV7 and use it on USB until you can afford it.
The specifications of this microphone look very good, and there are also a lot of “handling” features like an integraded headphone output, panel touch controls and the software suite you can use to process the sound on a desktop or laptop further. Imagine that this is three times more expensive that the BEST USB Microphone for Podcasts and Youtube, but believe us, it is worth it. We cannot recommend an upgrade mic to the Shure MV7 that doesn’t cost more than 1000$.
And we had to have a Dynamic microphone in our top because sometimes you don’t have the best studio out there and you want something that can just work in any conditions.
The Presonus Dynamic Vocal Microphone for Broadcasting and Podcasts is a budget XLR-only option that can deliver. Sure, it will lack mostly all the features that the 300$ option puts on the table, but at least sound quality is good.
We can recommend this microphone for content creators that already have a sound card for other projects, and want to describe their projects with a microphone. Just pay a small fee for this microphone, plug it into your sound card and start creating.
Final Thoughts on Microphone Choice
As you can see, the microphone market is very mature and options abound in 2023. Still, we stick to our internal way of thought, and would recommend an USB option if you want to start your channel pretty fast and don’t know how to operate audio equipment. We have provided two choices here.
If instead you know how to record audio and have a soundcard, we would recommend the high end or the budget option for XLR Connections.
Wellcome to our periodic round-up of the BEST DEALS available on music production VST Plugins. Here, we help you spend your hard-earn money on new toys and virtual gear. So without further ado, here is our list of five of the BEST DEALS on VST Plugins and their end date:
Izotope Complete Your Suite Sale – up to 80% off. Yes you heard that right, up to 80% off select Izotope VST Plugins in order for you to have more of the same quality and usability. There are also offers for upgrades here. Deal ends February 16th 2021 and can be found here.
Iceberg Audio – The Sub VST Synth – 33% off introductory price. This one is also on the usability side, and it’s a straightforward sub bass synth. For 33 Eur you get one envelope, glide and drive, so not that much BUT the sound quality is out if this world. It is an instant favourite our ours and the deal can be found here. It is only live until Februray 10.
. If you’ve been waiting for a great deal to get into Komplete, now is the time. They have heavily discounted their bundles, including Ultimate and Collector’s Edition. They did this also for the starter packs, and you can get them for as low as 199 Eur for the Select bundle. , and there is no end date specified, so go ahead and try your luck.
W.A. Production has a 68% off sale on preset packs for the most popular synths out there like Serum, Spire, Sylenth and much more. If Techno and House are your things, then this is for you. All major VST Synths are supported on this preset pack, and the deal ends on the 28th of February. Shop here!
55% Off Eden2 by UJAM and Bassroom by Mastering the Mix. Again, if dance music, especially Techno and House are your things, These two tools are indispensable. I am particularly fond of Bassroom, it is very useful on the master channel to round out and smooth your bassline. UJAM is a very nice drum machine too. This deal ends on 14th of Februray.
So there you have it, enough to get you through the end of Winter. Make sure you subscribe to our newsletters for more deals:
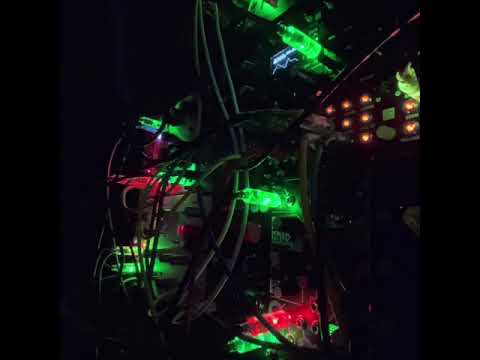
Building and having a modular synth can be a bit of a hassle. And when I say a bit, I mean a lot. Not being able to see any modulation values is one thing. Then, there is the fact that you will never be able to save a general patch due to the flexible nature of the synth. Also, another drawback is that stereo is close to non existent (unless you want to buy two of the same modules), not to mention polyphony (unless you want to buy six of the same modules to get a six voice synth).
But programming, or should we say patching a modular synth is so much fun. And you get a wonderful sense of freedom.
Still this alone does not make modular so attractive, especially if you are new to synths all along. Today, I will show you one product that makes entering this very distinct domain much more easy.
Yes, I am talking about Producertools’ new product, their Patchcables with Bi-color LED built in. This is a long time coming guys, for sure somebody would have done this by now. Now there is basically no excuse for you to not build that eurorack system that you wanted. This a pre-order program for now, delayed due to the COVID-19 pandemic. Still, shipping is supposed to be in March 2021.
So basically with these patch cables you will be able to see the polarity of the voltage and a rough estimation of its value. The built in LEDs will glow red or green depending if the voltage is plus or minus, so if the envelope or LFO is basically negative sloped or positive sloped. Also, the light the LEDs emit varies in intensity. You can see how it looks in the video below:
There are of course drawbacks for now, but the manufacturer said that there is minimal interference with the Eurorack Control Voltage that passes through. They even had to design their own LEDs for this.
Still, a bit of voltage does get used by the LEDs so will not reach the source.
So don’t use it with signals that require precision, like controling the pitch of oscillators with 1v/Oct signals. Best use is for non random (S&H) LFOs and Envelopes, where you can just offset/increase send voltage in order to compensate for LED consumption.