Category Archives: Music Software

Cloudbounce Online Mastering Service Honest Review

This month, we’re looking at CloudBounce online mastering for an underrated browser-based platform and desktop app that generates killer master tracks from your mix. We’ve already compared the best online mastering services before. Yet, for producers looking to maintain their sound, we go in-depth into one of the best options below…

Cloudbounce online mastering: super-fast music mastering with intelligent AI

CloudBounce is an AI music mastering platform similar to LANDR. Like its competitors, cloudbounce online mastering offers the option to upload a mixed track and let its AI master it to an industry standard, master unlimited files with its infinity plans and keep things secure with cloud backup. 

Based partly in Finland and partly in the US, it gets granular with specific genres. However, it also offers flexibility with both CloudBounce online and the CloudBounce app on desktop.

How does CloudBounce online mastering compare to a professional mastering engineer?

Essentially, the platform’s AI analyses the audio file and uses different audio processing tools to modify your track’s parameters by just the right amount. CloudBounce excels at sounding professional while still sticking to your original creative intention. 

This is one of its biggest selling points. With over 15 genre options it doesn’t require you to force your work into any particular standard. 

How does the CloudBounce post mastering options compare to it’s competitors?

CloudBounce online mastering has been gaining an edge over some of it’s competitors. So, we decided to look at why. 

Cloudbounce’s main competitor is LANDR, but when you look at the options you have to tweak your master, it’s pretty obvious. LANDR only offers three mastering styles on it’s Plugin – warm, balanced, and open. 

These more or less correspond to different eras and trends in audio technology. 

One area where LANDR has an advantage is that it offers controls. Fore example, the plugin has an equaliser section with low, mid, and high knobs. It also has automatic compression and a de-esser. 

These controls are not as diverse as the range of post mastering options that cloudbounce offers. However, they do allow the user more control. This means you can get slightly involved with the mastering process as opposed to leaving it all to AI. 

On the flipside, the cloudbounce post master options let you make it louder, warmer, dip or boost the mids, and control brightness, bass, and stereo width. 

We go deeper into what this means for the user below. However, first, let’s see how cloudbounce online mastering stacks up by itself.

Real producers tested CloudBounce: here’s what they found

CloudBounce was actually run past the ears of industry pros in controlled testing. This was to demonstrate whether people could pick out a track that employs machine listening and AI from those mastered by a professional mastering engineer. These found that masters made with CloudBounce were almost impossible to distinguish. This is due to how CloudBounce’s lightning fast AI quickly analyses sound characteristics and adapts to them.

Reasons to use CloudBounce online mastering service

Genre specifics are just one reason to use Cloudbounce. However, there are a few other things that give it an edge over other mastering options.

  • Smart technology: separating genres successfully enough to keep even the most detail-oriented producers happy is no small feat for AI when you think about it. Honestly, Cloudbounce wins out on this point. Plus, it offers specific subgenres in addition subjective qualities like warmth or openness. This means you get greater choice in an easier form. 
  • Not too polished: Furthermore, the above means the qualities that make genres such as punk appealing don’t have to be lost just because you’re using an AI mastering service. 
  • Major industry credibility: Cloudbounce is actually an alumnus of Abbey Road Red, which is the legendary recording studios’ tech incubator wing.
  • Lets you control parameters like boost, dip, warmth, and more
CloudBounce has a desktop app!

Cloudbounce mastering honest review: what else is good about it?

The biggest appeal is this is a very naturalistic AI. However, the industry quality technology means that it’s even been recommended by label founders. This is especially as a way to ensure your track gets heard when submitting to professionals. In fact, it is actually recommended as a way to optimize your music for Spotify. 

How does the AI work?

Cloudbounce does this through complex stereo imaging using audio processing ingredients like EQ, compression, and an inbuilt limiter. This boosts your sound quality like a real audio engineer would, both online and on the desktop app, and also adds polish.

How much does CloudBounce cost?

Depending on which plan you go for, Cloudbounce pricing can range anywhere from 10.90 USD to 219.00 USD. You can click here to go to their website and check out the current price.

CloudBounce mastering subscription options: one-off purchases vs infinity, CloudBounce desktop app, and more

One great feature of CloudBounce mastering is that it actually lets you purchase tracks on a one-off basis. So if you’re not immediately sure, you don’t have to sign up to any packages. CloudBounce is a small company and there have been complaints in the past about it’s lack of customer support. However, the one-off purchase option lets you try things upfront.

Best for testing things out: An individual master, which costs 10.90 USD and includes 16 and 24 Bit Wav as well as 320 kbps MP3. There’s no limit to the amount of individual masters you can purchase. 

Best for casual to serious music producers: The Infinity Monthly Plan – everything included in a one-off master for 21.90 USD. Plus you can store unlimited files with its cloud backup.

Best for passionate musicians and unlimited mastering: the Infinity Yearly plan offers the same for 219.00 USD. This truly gives you the unlimited masters needed to experiment if you don’t get your ideal sound quality first time around.

CloudBounce vs LANDR

Ok, what makes CloudBounce online audio mastering stand out from other mastering options that do a similar thing? There are a lot of companies that offer to give you a commercial-level sound via high-quality audio mastering. So let’s see how it compares to LANDR. 

Does it matter that CloudBounce is missing some of the features of LANDR? 

CloudBounce online mastering, and the (since 2020) new desktop app, are still one of the best mastering options for freedom and flexibility with your sound. In fact both online and the desktop version have over 20+ settings for the final result.

Yes, LANDR offers options like instant shareability. However, CloudBounce gives you more scope to keep your individual sound as a producer. Should you choose CloudBounce over LANDR? Why or Why not? 

Ultimately as we said above, CloudBounce has been gaining some significant popularity in recent years. Heres why we think it more than makes up for the areas where LANDR superficially is better. 

WHY CLOUDBOUNCE WINS (DEPENDING ON YOUR REQUIREMENTS) 

  • So, so much cheaper. The mthly subscription model and pay per song strcture of cloudbounce mean it is jsut so much mroe affordable for the averga emusician. Enough said. 
  • LANDR may be slightly more interactive (more manual controls), but the automatic post mastering setting on cloudbounce offer more variety
  • Much easier to use. You don’t have to have any prior production knowledge. And the genre names and descriptors don’t require much technical know-how either. 

Ok, so it seems like CloudBounce’s pros are finally getting recognised. What other great features does it have? 

Cloudbounce 2 free masters for CDBaby and Soundrop customers 

If you’re already a CDBaby user, CloudBounce allows you to get two free masters to see if you’re a fan and offers the same for Soundrop customers. So, in the end, this partly makes up for its lack of other distribution features. 

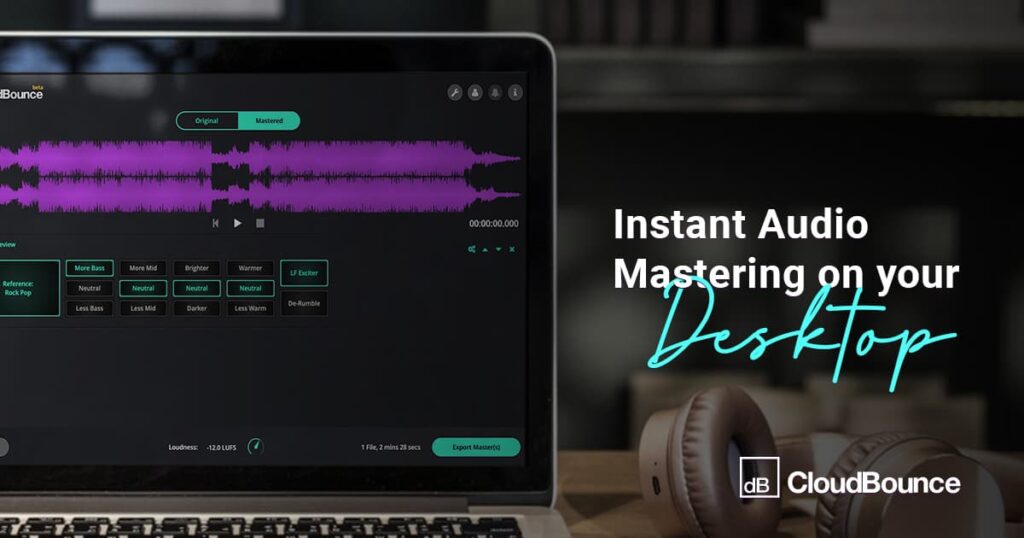
CloudBounce new desktop app- the biggest update since this platform’s inception

The new CloudBounce desktop app actually offers more exciting mastering options compared with the browser-based version. Here, it offers reference-based mastering where you can upload your own references or choose from those provided. This feature is actually limited to the desktop app, which requires you to subscribe to either of the two infinity plans. 

CloudBounce review in summary: 

PROS:

  • Ability to purchase masters on a one-off basis 
  • Desktop app has reference-based mastering options (including using existing genre references)
  • Exclusive free masters for users of other services (CDBaby, Soundrop) 
  • Granular, genre-specific mastering styles help you maintain the sound that you want both on the desktop app and on your browser
  • Both the browser version and desktop app supports the ability to upload multiple audio files
  • Compatible with all major file formats (WAV, AIFF, and MP3 on the single purchase and OGG, FLAC, and AIFF on the infinity version) 
  • Instant previews let you discard a master that you don’t like
  • Master entire albums and specify album-wide settings, track order, and more

Cons:

  • Relatively few additional options at a high price. However, this depends on individual producers preferences.

You can go to the Cloudbounce website to see the current offer by clicking here.

Final Thoughts: 

Ultimately CloudBounce is one of the best quality options in terms of naturalistic, human-like mastering AI. It’s not concerned with giving you an innumerable amount of tools. However, it IS perfect for authentic, varied masters that don’t compromise quality. 

If you love detailed reviews, we have a whole section of them. Plus, for more music software to hack your production, check out our software section.

Best Moog Synth VST Plugin – A Look at Memorymode from Cherry Audio

When looking for a moog synth vst, you can be spoiled for choice. In fact. we’ve previously covered a rundown of the best moog synth vsts out there. However, the Memorymode from Cherry Audio really deserves a mention, as it takes on the legacy of Moog’s polyphonic synths for one of the most inventive emulations yet. Read on for a look at how Memorymode replicates the legendary Memorymoog synthesizer of the 80s. 

What is this moog synth vst inspired by?

The original Memorymoog synth was a lush, creamy polyphonic analog synthesizer. It appeared in 1982 and was made by Moog as they ventured into polyphony. The Memorymode does its best to faithfully emulate this as a vst plugin. The designers even went so far as to use a Memorymoog owned by jazz legend Chick Corea. The result is essentially a super high-quality digital Memorymoog – but even simpler to use.  

The designers behind Memorymode make this vst equally exciting, as the team included Fleetwood Mac and The Cure collaborator David Polich, and naturally, as a vst, it doesn’t have the few issues with tuning that showed up on the original.

System Requirements:

To begin with, here’s a breakdown of what you need to run this fantastic plugin:

  • Windows 7 and above 64-bit or Mac 10.13 or above 64-bit required
  • also supports MacOS 13 Ventura
  • both available in VST, VST3, AAX and standalone formats
  • 8 GB Ram recommended
  • Native Apple M1 and M1 Ultra supported

Availability: You can buy the Memorymode from Plugin Boutique, where it is currently on offer, by clicking this link. If you buy using our link, you will be helping our website since we get a small kickback. Thanks!

Memorymode: a moog synth vst that replicates the original 

It’s fair to say that the Memorymode is a faithful emulation of the original. This goes right down to how the designers worked with a real Memorymoog to do this. But does it live up to this?

The Memorymode does a really good job at replicating everything that makes the Memorymoog so desired. That’s because the designers actually took the original factory preset patches of the Memorymoog and replicated them for the Memorymode. It doesn’t just provide a similar sound. It’s a Memorymoog for those who can’t get their hands on one, with additions.

The designers also clearly put a lot of thought into how to expand on the original. It uses the original ladder filter system but then adds touches like tempo sync on some of the FX for a modern feel. Then there are details like how the filters were replicas of the original Memorymoog. It shows, because the only noticeable differences in sound are ones you would expect from the fact it’s digital. Likewise, the only features they changed are to do with navigation. Here, they streamlined some of the input methods and introduced menus more suited to vst plugins. The vst has lost the original’s numerical keyboards, but its ease of use is second to none and it’s got some really cool updated features, as seen below:

Memorymode moog synth vst features:

  • Three oscillators and ladder filter system of the original, 16 voice polyphony and single key chord memory
  • 6 destinations for voice modulation
  • 48 oscillator per key unison mode
  • Repurposing of classic features for modern musicians. Notably: tempo sync on the LFO, delay, and arpeggio features (not featured on the original!)
  • Moderniser features that touches up the sound to make it more contemporary (by altering the bass and high frequencies) 
  • Drift parameter – this is a really cool feature that allows you to alter the tuning. This can make your instrument sound ‘aged’ or ‘slack’, bringing real character that is sometimes hard to find with digital vsts. 
  • Phaser, echo, reverb, and stereo ensemble effects 
  • Full midi polyphonic expression capability (not possible with the original!) 
  • Midi control and daw automation 
  • Ultra-low CPU

Memorymode moog synth vst – what’s good about it?

Obviously one of the biggest upsides of the Memorymode is the price. It’s affordable for most musicians especially as secondhand Memorymoogs are expensive and disappear quickly.

The Memorymode was one of the last synths Moog designed before the company shut down. Now, it has a relatively legendary status for simply sounding great. 

Such an accurate emulation shows that the people behind the Memorymode genuinely care about providing an alternative for fans. The Memorymode is not just taking a few bits of inspiration here and there. They nailed the things that make original Moog synths still so popular, but also introduced new additions which worked with what made the original great. For example, the Memorymode has the same overdrive when pushed that the original hardware synth did. Yet, the new FX also sound fantastic with it. Ultimately, it’s little features like this, that create the color that musicians loved. 

This isn’t just a synth for hardcore Moog fans though. As a general vst plugin it stands up without having to attach itself to the legacy of its hardware counterpart. It just sounds great. You can hear the lush sounds that the Memorymoog became known for. The factory presets are fantastic too, so if you’re looking for a polyphonic synth plugin, it works well on its own accord.

Is there anything bad about the Memorymode?

There’s not much bad to say about the Memorymode, it does a really good replica of the Memorymoog and it ensures that the qualities that helped gain its original fans are here. 

However, the only thing is that it doesn’t have a huge variety of sounds outside what you would consider ‘classic’ Moog features, but that’s to be expected. However, if you’re looking for a good replica or even deciding which moog synth vst to go for, this is a really good option. It gives you a great introduction to the typical Moog sound. Similarly, it has all the richness and character of the synth that it models. 

You can buy the Memorymode from Plugin Boutique by clicking this link.

Final Thoughts

Ultimately there are very few bad things to say about the Memorymode – the fact that a replica of a great polyphonic Moog synth exists is just a start. However, the Memorymode also works because the synth it emulates was so great in the first place. Ultimately it’s really worth it as a moog vst plugin. Yet even for those who aren’t fans of these synths, the Memorymode is a great polyphonic synth vst for your setup.

Liked this? We have many more articles on music software, plus more on emulations of classic synths here too.

Train Your Ears for Guitar – Why This Ear Training Software Actually WORKS

For guitar, music ear training apps can be of varying quality. Yet here, we review the best and simplest which shines because it includes the MOST relevant and easy-to-understand parts of the mixing process.

This is Train Your Ears EQ Edition. As a guitarist who tried to learn EQ from tutorials online, I found the immersive experience of Train Your Ears was the missing link I needed. We’ve reviewed it in general before, plus we’re also covering how it worked for electronic musicians this month – but here, read on for why it’s so great when adapted to guitar.

OK, why is Train Your Ears so great for guitar music ear training?

This involves two things that make it stand out. The first is it looks at patterns, not learning by rote. The second is that it’s adaptable to however you want to use it.

When we say Train Your Ears teaches you patterns, this means that the developers have looked at the crucial building blocks of understanding EQ and focused on showing how you can use them and apply them to anything. This links to how it’s adaptable. Train Your Ears doesn’t teach you in a fixed context. It simply gives you the independent ability to apply your knowledge to whatever tracks you like.

As guitarists, who are often more used to doing things by ear, this can work amazingly.

Is Train Your Ears easy to use?

I personally found the setup for Train Your Ears to be really intuitive as they basically do everything for you on the website. After downloading the app, you drag it to the folder you desire on your laptop as usual and you’re presented with a page of options when you first start it up, one of which is ‘play some music’.

To do this you can use any track, whether one of your own or something from your favorite bands. I used a track from the modern UK grunge band Dirty Modal Souls, so there was plenty of delicious crunchy guitar to practice ear training with. However, you’ve first got to get the track to play in the app. 

This is a simple drag and drop to the audio player, so you can add the track as an m4a file from your iTunes library or as an mp3 file or WAV file – the choice is yours and sometimes it can help to use a variety so you can hear the difference between compressed and uncompressed audio. 

Using the app this way makes it fun to practice as you are listening to your favorite music at the same time. 

How can I use Train Your Ears when practicing?

You can actually get the app to play tracks directly from your iTunes library, as in order to do the exercises you need the track to play live. You can do this by routing the audio of your computer so that train your ears receives audio input internally direct from your laptop. 

If you’re using iOS, you need to download BlackHole which fortunately you can do from the train your ears website live player page here. However, when you have the app open it also gives you simple instructions. If on Windows, you can likewise use the program VB cable which you can also get from the website we’ve linked above. 

After running the installer and following the instructions on the train your ears website to route your internal audio correctly, you’re all set and can play from iTunes and other places on your computer. 

Likewise, you can use your audio interface to route external audio such as from an iPod or other music player. 

Best guitar music ear training tips: how to get the MOST out of this software

  • Ensure you’ve got the right song for the exercise 

It goes without saying, but make sure you pick the right song for the exercise. If you’ve always struggled with separating bandwidths in big walls of sound, pick a song that has this and hop on board with the first exercise, recommended by Train Your Ears, which is on guessing which bandwidths have been modified. 

As a beginner exercise, this is simple and easily helps you understand the quirks and nuances of different bandwidths and what they sound like. This ranges from the echoing, booming sounds that come from giving the middle a boost or the way cutting lower frequencies can make your track sound toppy or thin. 

However, the exercises do get harder. 

  • Use multiple tracks in the same genre as reference points 

Another way to get the most out of Train Your Ears is to use multiple tracks so you’re not just practicing within one environment. Using multiple tracks helps you spot the patterns of sound between tracks and genres. You’ll end up knowing what compression or different bandwidth cuts sound like despite what’s going on with the rest of the instruments. 

Ultimately by learning the patterns and processes behind mixing audio, you will end up with an aural skillset that can help you adapt to any track. 

As a guitarist, to vary things it helps to practice on a couple of slow tracks with less guitar (such as ballads) as well as with a couple where there’s more going on, such as anything with double-tracked guitar or layers of sound. Focusing on guitar solos is also a separate area as here you’ll gain experience with frequencies up at the high end of the spectrum and how they change based on other instruments.

So, why does Train Your Ears work so well for guitar music ear training?

The takeaway is, nothing exists in isolation. Although Train Your Ears is deceptively simple at first, it provides a really comprehensive set of exercises that offer you new challenges in new contexts based on the tracks you choose to use, so keep challenging yourself, and it will likewise keep challenging you – and pay off, as well, 

It doesn’t try to teach you – it lets you teach yourself (and it’s easy to set up!) 

Train your ears allows you to adapt the exercises to whatever your preferred genre is. This makes it consistently relevant to your playing, even down to what you may be working on RIGHT NOW> By doing away with orthodoxy, set teaching programs, and conventional ways of doing things, it works with how many guitarists learn in the first play. 

Final Thoughts

Ultimately I found Train Your Ears works because it reminded me of learning to play guitar in the first place – I was teaching myself and learning about how the fretboard worked in the context of my favorite songs. Train Your Ears does just that with the EQ spectrum and more. It covers pairs of contrasts such as high cut and low shelf filters as well as challenging you from new angles such as with exercises that ask you to find bandwidths. Ultimately it’s a program you can keep returning to, because it stays consistently relevant to whatever you’re currently working on. Plus, it doesn’t become too easy, because of the sheer variety of ways in which you can use it.

Train Your Ears is available from their website and is currently reduced to 49 EUR. You can check the Train Your Ears website by clicking here. We are affiliated so if you click on our link and buy the product, we get a small payment which supports the work we do here at idesignsound.com.

If you love reviews, we have more of them in our reviews section where we break down other fantastic software for guitar and more!

Best Underrated Plugins 2023 – 5 Guitar Plugins You Need to Know

For this 2023 VST plugin rundown for guitar, we’re looking at underrated plugins which deserve to be in the spotlight. This list covers those which bring something special to the range of sonic possibilities. They can be chock a block full of FX or just doing one thing simply but really well, like the Softube Amp Room. Either way, these stand-out options still hold strong. so let’s kick this year off with a blast of new inspiration. 

Best 2023 VST Plugin for Metal Guitar – Softube Metal Amp Room

This is a super simple guitar VST plugin, but don’t let its appearance mislead you. The metal amp room offers the ultimate for allowing you to sculpt a hyper-realistic sound. Here, you can get down the real nuances which make your playing emulate analogue gear. Metal Amp Room is formed by an analogue-modelled room with two amps, and total freedom of mic placement. This plugin holds up strong and is proof that more isn’t always better. The ones are fantastic for metal; they also do a vintage amp room too.

Features: 

  • Absolute bare-bones features makes this a clean and stripped-back plugin 
  • Octave pedal, distortion, church reverb, EQ, Fuzz, compression, boost, and chorus pedals 
  • Officially licenced FX designed by the likes of Marshall and tube tech 
  • Huge number of packages included with specific focus on metal including a Marshall specific pack and 5 packs of metal tones from producers like Kristian Kohlmannslehner 
  • Ability to upgrade from legacy amp room plugins 
  • Studio realism makes it great for translating projects to real life 

Price and Availability: Amp Room in its entirety is currently available on Pluginboutique – you can click here to see the current price.

Best Free Guitar VST Plugin 2023 – Amplitube Custom Shop

Not strictly a guitar VST in the classic sense but absolutely worth a mention. The Amplitube Custom shop works great with plugins like the Amplitube 5 but is fantastic on its own too. Essentially it’s a virtual gear warehouse where you can purchase credits to then buy gear, but this doesn’t do it justice.

The range is slated to keep expanding, and choices like the Mudhoney pedal give you unusual sonic possibilities. Plus, there’s classic, officially certified gear from brands like Orange. Many of the options have trial periods too. With this much to offer for free and with a credit model you control, there is no downside. This really is a fantastic swiss-army knife of virtual gear, and really easily makes this list as one of the best guitar-related VST plugins of 2023.

Features: 

  • The unique freemium model allows you to customise to your heart’s content 
  • The free version starts with 24 pieces of gear
  • 9 stompboxes, 4 amps, 5 cabs, 3 mics with 2 movable, and 2 rack FX
  • Credit system means the more you buy (especially when purchasing credits in bulk) the less expensive gear becomes
  • Works well with other Amplitube plugins but also as a stand-alone Mac or PC app. 
  • Emulates legendary gear with professional attention to detail 
  • 280 unique models of gear 

Price and Availability: FREE and available from the IK Multimedia Website by clicking here.

Best Paid Amp Sim – Archetype and Plini by Neural DSP

This is an affordable amp sim which is simply one of the most exciting innovations over the past few years. Australian guitarist Plini has made waves for himself with stunning virtuoso techniques which he first demonstrated under the pseudonym halcyon. After he gained the attention of guitar master Steve Vai Neural DSP has now endorsed him as part of their archetype range. The Archetype: Plini plugin was one they designed in tandem with him and it shows. 

Focus on cleanliness and precision even with the heaviest of tones is a feature here. The website gives a rundown of three amps with dedicated clean, rhythm (crunch) and lead classifications. This means even if you’re not a shredding virtuoso yourself you can gain clarity and attention to detail reminiscent of bands like Periphery – who he has opened for – or Plini himself.

Neural DSP has focussed on not chucking in as many FX as possible, instead getting the most out of the ones included. Features like the reverb plugin allow for control not just over classic parameters like wetness and dryness but also more nonlinear, intuitive ones like space and time 

Features: 

  • Specific amps for clean crunch and overdrive
  • Dynamic FX inc EQ, comp, and reverb for seamlessly blending different parts together, 
  • Digital delay and tape sat 
  • Space and time controls for ultimate soundscape scul[ting 
  • High-quality cab sim with six mic positions and full panning ability in stereo
  • Part of a wider Neural DSP Archetype range 

Price and Availability: listed as 119 euros on their site (128 USD) and available to buy online on Neural DSP’s website. 

Best Guitar Processor Sim VST Plugin – Line 6 Helix Native 

VST plugins which emulate potentially unaffordable hardware can open up a whole new range of options. This is a direct and affordable emulation of Line 6’s physical Helix which clocks in at over 1000 USD, perfect as a budget option or if you own a member of the Helix family and want to keep things consistent.

For the hardware Helix series, line 6 ruled out menu diving and created a pioneering, clean-cut collection of vintage sounds, FX, amps, cabs, mics, and more, focusing on tube amps to give you a classic sound which can work in many situations. Ultimately for 2023, guitar VST plugins which span eras and genres can make it easy to start with something new and the Helix Native makes this reality with its bold selection of offerings.

Features: 

  • True to the Hardware Helix family of guitar processors 
  • Analogue modelling technology captures the feeling of analogue gear
  • True-to-life circuitry emulates the sound of the amps it is based on 
  • 16 cab options and 23 microphone distances 
  • Ability to control all parts of the signal chain in a nonlinear and intuitive way 
  • 15-day free trial 
  • Features amp settings based on classic amps by fender, vox, marshall, orange, and silvertone
  • Brit cabs, tweed, leads, and options for jazz
  • Can span everything from jazz to metal 

Price and Availability: at 369 euros (399 USD) this is one of the most expensive plugins on this list but Line 6 do offer a reduced cost if you register Helix hardware. Available for purchase from their website 

Best Hidden Gem Guitar VST Plugin – Soundtoys Decapitator 

Some guitar VSTs just seamlessly integrate into your workflow. For example, parallel processing is an absolutely indispensable trick for producing many heavy genres of music involving routing a signal by a bus, adding FX, and blending this back into the dry signal. The Decapitator works well with this and it’s a really unique saturation plugin which the website claims is the ‘secret weapon’ of top mix engineers.

Honestly, it deserves more time in the limelight in 2023, because of how it takes saturation and turns it up to eleven. In fact, the decapitator offers unprecedented scope in terms of distortion from subtle to extreme. Its ‘punish’ button offers ultra-high gain features which bring the visceral results of cranking up real-life analogue hardware to digital modelling and for that it deserves more attention. 

Features: 

  • High-cut and low-cut filters 
  • Tone and mix dials 
  • Attitude dial and punish button for really warm, gritty sounds 
  • Multi-genre and very versatile 
  • AAX Native and Audiosuite, Au, and VSt formats 
  • Compatible with all major DAWs 

Price and Availability: Arround 200 USD and available from their Pluginboutique – just click here. If you use our link to buy the product, we will get a small kickback. Thank you for your support!

Final Thoughts

Choosing the ‘top’ plugins for any year is hard, but this 2023 guitar VST plugins rundown aims to give the spotlight to options you might not have considered yet. Overall, these plugins either do what they do best, or offer totally new ways of looking at things. These VSTs can shake up your current sound design with a fresh offering, giving you multiple new possibilities to shake things up when inspiration runs dry. 

Love finding game changing new music software? We have a whole software section here.

Best Underrated Budget DAW: A Guide to Reaper by Cockos

Looking for an underrated budget DAW? Your best bet is Reaper, one of the best DAWs which is still relatively underground. We briefly mentioned this DAW in our budget sound design guide here, but it honestly deserves a full feature. Reaper is a simple but effective DAW, perfect both for seasoned producers and those starting out. Read on for a proper, in-depth look at what makes it so great.

Best Underrated Budget DAW: What Makes Reaper Stand Out

All of Reaper’s best points are actually highly dependent on personal preference. Ultimately, this is a breakdown of what makes it unique – yet its tight-knit following proves these quirks are part of its appeal

  • Simplicity

Reaper’s simplicity is also its biggest potential downside, but in its own way, it’s actually a real selling point. The clean interface allows you to project your own way of doing things onto a basic format. Options to organise and colour code tracks may at first appear limited, but actually provide everything you need and customisable packs can be downloaded from the official site.

  • Value for Money

Another bonus is Reaper’s value for money. The DAW costs 225 USD for the commercial listen or 60 USD for the basic licence.  At such a great price for personal use, this really makes it stand out compared to Logic and others.

  • 60-Day Trial Period

Speaking of the trial period, Reaper gives you the option to ‘purchase now’ or click ‘still evaluating’. What this shows is that Reaper is good enough that legions of musicians have chosen to pay for this bit of kit. The developers, Cockos, brand it as ‘audio production without limits’. Ultimately there are no downsides to taking the plunge with the trial period – especially when other DAWs require payment upfront.

  • Freedom of Organisation

Reaper is really minimalist in its interface, and as a result, it doesn’t use as much processing power as more complex daws. It also has next to no extraneous content, going by the rule of thumb that more doesn’t necessarily equal better. For example, the built-in drummers and loops found on a DAW like Logic are omitted, meaning it takes up minimal space, with the flip side being that it’s relatively bland in terms of visuals. As mentioned above, you can buy customisable user interfaces from Cockos, However, if cleanly organised and stripped-back daws are your thing, you might not need it, and ultimately Reaper raises the question as to how many extra features on other DAWs actually get used by the average, serious producer.

An Underrated Budget DAW: Are There Any Pitfalls?

The one thing which makes it a bit different is the fact you have to sift through files to find the FX you need. Some people have found that as a result, on a surface level it is not as intuitive as other DAWs. It’s sort of like Linux – an operating system which differs considerably from other options on the market but which has users who swear by these differences. 

What Other Good Points Does Reaper Have?

The most potentially polarising thing about Reaper is how stripped back it is. Although we’ve mentioned earlier how this can be a plus, looking deeper into its usefulness reveals Reaper to be even more of a worthy candidate for your favourite value DAW.

  • easily adaptable to any genre 

The bare-bones layout of Reaper is another potential downside which can actually be a bonus. unlike, say, Ableton or FL Studio, Reaper really does work for any genre. Ultimately, you are getting an absolute breakdown of the signal chain and recording studio, digitally and in miniature – without being steered one way or another by the developers’ creative preferences.

  •  lack of presets stimulates creative innovation 

So, as Reaper doesn’t have any built-in loops or software instruments. it’s geared more towards those who are already confident recording. It’s not as easy to quickly make a track which sounds good as with something like Apple Loops. However, a pro is that this total freedom can actually stimulate creativity. It can seem scary at first, but this is the kind of thing which can really challenge you as a producer. Ultimately, Reaper is a bold experiment as to what happens if you give musicians just the basics.

Tech Specs: Everything You Need to Know About Reaper

Don’t let its basic appearance fool you! Like any DAW worth its salt, Reaper allows you to:

  • side-chain
  • glue, resize, loop, and overdub tracks
  • create busses
  • colour code tracks
  • add the full expanse of necessary FX and plugins

Beyond the quirks about having to dig through files, Reaper’s interface is easily understandable if you’ve used Logic or even other DAWs such as Ableton Live. In addition, its built-in FX, sampler, and synth are very high quality, if slightly generic in terms of style. However, like most things to do with Reaper, this can be a bonus because it makes them very adaptable.

Reaper- A Basic Plugin Rundown:

  • ReaEQ – EQ plugin
  • ReaVerb – high-quality neutral-sounding reverb
  • JS Saturation – saturation plugin
  • ReaComp – compressor
  • ReaGate – high-quality gate with sidechain options
  • ReaTune – manual and automatic pitch correction plugin
  • ReaSynth – high-quality basic synth
  • ReaSample – Reaper’s own sampler

… and lots more! What’s great is these can actually be downloaded as a package to use with other hosts. Yes, that’s how much some users like the sound of them. And, like everything Reaper, they’re all really low CPU.

What Does Reaper NOT Have?

  • built-in software instruments.
  • the personalisation of daws like logic
  • real recorded session musicians on their virtual instruments. however, as said before, this can be a bonus in that it promotes more creativity. 

Final Thoughts: Is Reaper Worth It?

Ultimately, the answer is a resounding YES. For such an underrated, basic-looking DAW, Reaper has very few flaws. If you’re confident with mixing and mastering, it’s easy to get to grips with. Even if you’re not, it’s an ideal place to learn the ropes due to its simplicity. If in doubt, Reaper is 100% worth trialling for the free 60 days it gives you. Regardless of your preferences, you never know which bits of it might grow on you. 

Best Pedals For Punk, Pop-Punk, and Post-Punk: A Rundown

What makes a stompbox rank as the best pedal for punk rock? We could do a very general rundown, but this time we’ve decided to go granular. Here is our final list of the best pedals for punk rock in all its forms – whether pop punk, post punk, or just plain old classic punk. 

Since the inception of the genre in the 1970s, its underground values meant that musicians prized inventiveness. This remained true in their use of pedals and other FX, which go for raw sound and charm as opposed to technical sophistication. For the end of this year, here are both old classics and new innovations which will inspire you to continue this independent spirit. 

We could not update this list without giving the Fender Shields Blender. Bringing you the sound of My Bloody Valentine, this limited edition pedal may be on the larger side but has a truly enigmatic tone.

Best Pedals for Punk: MXR Billie Joe Armstrong Dookie Drive for Classic 90s Pop-Punk

Although this pedal has been discontinued, it remains extremely popular and deserves a spot here. This is a signature pedal which MXR created for Billie Joe Armstrong of Greenday, and it is based on the sounds he used for the pop-punk band’s classic album Dookie. Now, with the Dookie Drive, you can give the sounds of this seminal album your own spin.

The 90s were a golden age for guitar-driven, power-chord-based rock. The sound of this pedal is a tribute to its heyday, and it is even covered with Greenday’s album art. To achieve what it does, it combines the sounds of both the amps Billie Joe Armstrong used on the album in one pedal. Ultimately, this is a classic, pop-punk drive pedal you cannot go wrong with and deserves it’s legacy continued this year.

Dookie Drive Contains:

  • Output, blend, gain, and tone knobs for mixing the perfect sound
  • Scoop option to sculpt your sound even more

Price and availability: The Dookie Drive was limited edition and had multiple variants, but can still be bought online from Reverb. Click here to check the price and offers!

If you are looking for an artist-inspired pedal, look no further than the Fender Shields Blender, which we cover further down this list. Whatever your taste, there is a world of innovation that happened between Greenday’s heydey and the first moments Shields used his iconic Fender circuit.However, if you are happy with a broader range of punk subgenres, we do think the MBV-inspired pedal is just as exciting as the Dookie Drive in a completely different way.

Best Pedals for Punk – Distortion and Best Outside the Box Pedal – JHS3 Series Compression and JHS Series Distortion

The new JHS3 series is so exciting it deserves to include two pedals. To kick off, the JHS3 distortion pedal is a warm, gritty distortion. It sounds deliciously heavy down at the low end of the neck. Simultaneously, it adds messy noise when played higher up the fretboard. As a result, this slick little pedal is perfect both for punchy, post-punk riffs and for giving your tracks a more tangled, DIY flair. 

What about compression? Distortion and overdrive both involve a bit of compression. Yet, if you want to add solos or high harmonies, a compression pedal can be indispensable to prevent your lower parts drowning others out. This can especially be a risk when playing punk and related genres live. The JHS3 series Compressor is a great compressor which doesn’t sound too polished or neat. At the same time, it ensures all parts are audible- perfect for performing in even the most acoustically challenging venues. 

JHS3 Distortion Contains:

  • Volume, filter, and distortion knobs
  • Gain switch

JHS3 Compressor Contains:

  • volume, attack, and sustain knobs
  • bright switch

Price and Availability: Both pedals can be purchased new or used on Reverb by following these links: compressor and distortion. Plus, you will be supporting our website if you buy using our links (we get a small kickback).

Best Pedals for Punk and Post-Punk FX – Fender Hammertone Fuzz Pedal

Fuzz pedals can be polarising. Nevertheless, although it brands itself as 60s and 70s-focused, the Fender Hammertone series fuzz pedal has made this list because of its heavy, wild sound. It’s a great way to add some really dirty tones to different parts of your tracks. Especially for pop-punk, post-punk, and emo, which have sometimes taken inspiration from rock ‘n’ roll, it’s worth trying out pedals like this to shake things up. To help this, the Hammertone fuzz pedal is versatile enough that it is capable of adding noise yet also adapting to quieter moments.

Fender Hammertone Fuzz Pedal Contains:

  • Treble, bass, level, and gain knobs
  • top mounted in and out jacks to ensure it fits easily into your pedalboard
  • octave switch

Price and Availability: Check Reverb.com by clicking here.

Fender Shields Blender

Like we said earlier in the article, we can’t update a post-punk stompbox rundown without including this pedal. The Fender Shields Blender was released earlier this year and designed around the Fender circuit of My Bloody Valentine guitarist Kevin Shields. 

The Irish-English rock band pioneered the shoegaze genre and brought an experimental touch to post-punk. 

This pedal could be polarising depending on how much you like MBV’s sound. However, for fans, it’s very true to life with just enough of an updated twist. It follows the circuit of Shields original Blender stompbox with fuss, octave, trigger, sag, blend, sustain, tone, and volume knobs. 

It’s quite a chunky pedal so it’s probably not great if you don’t have much room on your pedalboard. 

However, we think it captures the sound of early shoegaze extremely well, giving you a melancholy clean tone while managing to be really dirty and gritty when ramped up all the way. 
Pricing and Availability – this pedal isn’t cheap, and is close to 300 USD. That said, it is limited edition. Check out the Fender Website here to track it down.

Wampler Moxie Mini Pedal: Best Innovation of This Year

Wampler released the Moxie this year, yet it takes inspiration from the classic Ibanez Tubescreamer. In fact, after it hit the market, this pedal stood out for attracting even those who disliked the original Tubscreamer. How? For starters, this pedal is a bit warmer, more punk, and less metal oriented than the original Tubescreamer. Tone switches for voice and fatness allow greater mastery of different subgenres. In addition, its sound is more rough and ready, which it does through a modified EQ curve. This is not an easy sweet spot to hit, and, as a result, the Moxie deserves a place on this list.

The Wampler Moxie Mini Pedal Includes:

  • volume, gain, and tone knobs
  • two switches for voice and fatness
  • design based off the Ibanez TS10 with a modified EQ for a richer, more transparent tone

Pricing and availability: It is on Reverb new or second hand, click here to check the deals.

Best All Round Drive Pedal – OCD Drive Pedal 

And to round up this list, we have a classic drive pedal which holds up year after year. This is for when you don’t want super heavy distortion but still need some edge. The sound blends well into many variants of the punk, post-punk and pop-punk spectrum. However, this can be a plus, as it gives your sound something distinctive that you can then repurpose.

Another big selling point is that the AmpliTube set of FX includes it as a digital VST. As a result, you can have the same sounds as both software and hardware, keeping your sonic signature consistent. 

OCD Drive includes:

  • Internal switch to choose between enhanced bypass and true bypass. True to its name, this pedal allows guitarists to choose the specifics of their sound at a level of perfection close to obsessiveness
  • output buffer which prevents pedals which come after it in the signal chain from affecting its sound

Pricing and availability: Can be purchased from Reverb.com, in all the versions. Click here to get the price.

Distortion alternative – MESA THROTTLE BOX 

With our 2023 updates for the best pedals for punk rock, we bring you something better suited to the 90s now. After the Fender Shields Blemder, we give the Mesa Throttle Box a mention. Although this pedal has been out a while we felt the list wasn’t complete without something to get you the heavier sounds of 90s punk rock. 

This pedal comes with level, gain, mid-cut, and tone knobs. The biggest feature is the mid-cut, which is a signature for this pedal, increasing heaviness and giving you a really overdriven sound. The low/high gain switch also helps you refine your sound further. 

We included it here in case you need something heavier than any of our other offerings – especially as the loud/quiet dynamic has been a feature of 90s music and 4-power-chord songs since the days of the Pixies. 

Price and Availability: You can find the Throttlebox here on the Mesa Boogie website. Retail price is anything from 200-250 USD depending on retailer. You may be able to find it cheaper secondhand, too. 

Final Thoughts

This roundup focuses more on certain FX than others to get you that classic, heavy punk sound. However, these cover everything from gritty, classic underground 70s punk to the best modern-day pop-punk. From old favourites to new innovations, these pedals have proven to be the most inspiring this year.

Liked this article? We have way more on pedals in our hardware section, where we cover classics, new innovations, and creative alternatives. Find them here

How to start playing Guitar solos: BEST Software to learn Guitar Fretboard notes FAST

How long does it take to memorize the guitar fretboard? If you truly want to master the fretboard, it’s best to move away from relying on a fretboard chart and start memorizing chord positions, root notes, the CAGED system, and more. Here, we have included many options in our breakdown of the best software and apps to learn guitar fretboard fast and easily, as everyone has different methods that suit them best.

While a good practice routine is a must, you need more than just rote memorization. Learning the guitar fretboard for beginners can lead to boredom if you make this common mistake. However, learning interactively on the other hand can turbocharge your playing. Whether through mini-games or by slowing down your favorite solos, the fretboard is yours for the taking with these apps and other programs. Read on for some great software to help with just this. 

BEST FREE OPTION: LEARN GUITAR FRETBOARD EASILY WITH FA CHORDS

If you want to easily learn guitar fretboard positions at a low price, this is the software for you. The developer of this software is actually a guitar tutor, so you know this app has real thought behind it. FA Chords includes games that give you the same note from multiple angles. Whether as part of an interval, scale or by itself, contextual learning means unexpected notes don’t surprise you or slow you down.

Much of the content is based on the CAGED system which is across the board the best and most professional way of organizing the guitar fretboard neatly into fretboard positions and chord shapes that make soloing easy, and it makes up the basis of every guitar fretboard diagram

FA chords also introduces the Circle of Fifths. This bit of music theory shows how parts of the scale fit together and is one of the best ways to learn guitar fretboard notes by understanding the patterns behind the process. As a result, it’s an ultra-fast shortcut to playing your own solos. By building in theory to memorization games, FA Chords makes this topic accessible. Even if you just set out to master some basic scales, you’ll come out a lot more skilled. 

Specs/availability: All parts of the software are available for separate download on the website’s software page. They are available for all operating systems including Windows, Linux, iOS, and Android.

Price: Free, on their website (click here to access it).

GUITARLAYERS: BEST PAID OPTION TO LEARN GUITAR FRETBOARD NOTES EASILY

One of the best features of Guitar Layers and which we still think puts it near the top of this list is how it can generate chord shapes, positions, and inversions at the drop of a hat. 

In addition – why we still think it’s one of the best – it’s not just compatible with MacOS, it’s pretty much designed with this operating system in mind. Therefore it isn’t just great for hobbyist guitarists but also for professional educators and those who need high-quality software on a regular basis. 

If you want a gamified option to learn notes of the guitar fretboard, Guitar Layers is one of the slickest options on this list. Its sleek black interface and color-coded notes and chords make learning the fretboard a breeze. In addition, its unique learning pattern uses color coding to let you neatly sort notes, e.g. by the octave. 

Guitar Layers gets its name from its layered system of learning. This makes abstract concepts visual, like harmonizing. As a result, you’re able to see how scales and notes relate to each other and where they are in context. This goes a bit deeper than the theory of FA Chords, too. Guitar Layers actually shows you notes relatively. It also lets you make custom scales, and change the notes of any pre-existing scale. It’s on the more expensive side, but it’s worth it due to how comprehensive and high-quality is it. 

Specs/availability: Available for macOS from the app store. Not available as an app, although it’s aimed at education where most will have desktop access.

Price: 9.99 GBP or 12 USD (click here to access it)

BEST SIMPLE OPTION: MASTER GUITAR FRETBOARD WITH FRETBOARD WARRIOR

Whilst the previous two options are complete packages, Fretboard Warrior does one thing but does it well. In a similar vein to some of the games included with other apps here, it tests your knowledge of the notes on the fretboard by asking you to tap the correct place. This can help you learn guitar fretboard positions fast in ANY key because ALL positions are based around a root note. 

There are many options out there that promise to help you learn guitar fretboard notes in 10 minutes or other similarly impossible times. In truth, to properly learn the fretboard means using it dynamically. There is no shortcut, but this game comes close because it focuses on one specific thing but does it interactively. 

However, what sets it apart is that it’s very quick and convenient for focussing on just one thing. It’s speedy and without distractions, so it keeps your thinking flexible and fast. This is a really great transferrable skill for playing guitar solos, where it’s necessary to think on your feet. 

Specs/availability: Can be downloaded online from the developer

Price: Free (click here to access it)

LEARN GUITAR FRETBOARD FAST WITH FRETONOMY: BEST GAMEPLAY BASED OPTION

Ultimately, we still think this is one of the best options on the market due to the professionalism of the interface. This puts it up there along with GuitarLayers. Whilst some of these apps are created by and aimed at hobbysists, this one is pretty professional. However the company is also always open to feedback here:

Yes, this one has 18 mini-games. Fretonomy is big both on the aesthetics, and on the games. If you learn most easily  in a fun and interactive environment, this is by far the best app on the list. It has up to 18 different mini-games and it is a value-for-money option for learning guitar fretboard positions for beginners and intermediate guitarists alike, as it is technically free but offers in-app purchases.

The interface is smart and eye-catching with both an overview of a fretboard plus chord positions and names and a musical stave so you can see music in different forms. Bonus points to this app for including this last part as many guitarists rely on tab, but it never hurts to learn to read music. 

Like most of the software on this list, Fretonomy also teaches chords, chord positions, scales, and intervals. However, it also offers a nice selection of chord progressions for help with songwriting.

Specs/availability: Available on both the app store and for Android

Price: Free, but offers in-app purchases (click here to access it)

BEST BONUS OPTION: SOLO ALL OVER THE FRETBOARD WITH THE AMAZING SLOW DOWNER 

One of the best ways to learn the notes and chords of the guitar fretboard is to play solos to contextualize your knowledge. It is not hard to learn to solo on guitar but if you really want to master the fretboard, it’s an essential skill. Contrary to what you may read online, it is not possible to learn to solo in 5 minutes or other ridiculously short times. It takes dedication and practice, but this app makes the process a lot faster and easier. 

. This app is expensive, but worth it to adjust the tempo of any piece of music. In this way, you can slow things down to your ideal tempo. This also lets you break down a solo so it’s easier to learn, which is arguably the most appealing feature of the app. 

Although it’s not strictly educational, this deserves includion as one of the best alternative apps to learn the guitar fretboard notes and chord positions because of how it connects this to wider playing techniques.. By slowing down songs you can break guitar solos into their constituent parts and patterns. getting to grips with the real building blocks of constructing your own. As a result, working your way from the first fret to the twelfth has never been easier. 

Specs/availability: Available on the app store. Also available for Microsoft Windows – but it’s considerably more expensive at 39.99 USD.

Price: 14.99 USD (click here to access the Mac version)

HONOURABLE MENTION: LEARNING GUITAR FRETBOARD FAST AND SCIENTIFICALLY WITH FRETPRO APP

Fretpro isn’t exactly the best app to learn guitar fretboard overall if you want more depth, but it’s still a really neat piece of software. It’s basic, but it’s not pretending to be anything more. Its purpose is just to help you learn the notes of the fretboard. However, its learning style is high tech and it uses something called spaced repetition, where the same questions come at irregular intervals. Science has proven that this keeps your thinking sharp and flexible – a must for independently moving up and down the fretboard. 

Approaching guitar this way means it’s easier to handle novelty. This is one thing several apps on this list have in common. It’s a vital skill – for example when you’re sight reading or at a jam session. This method also helps learn large amounts of information by keeping all parts interconnected. With this app, you will memorize the fretboard so easily that you soon won’t need a guitar fretboard diagram. Instead, you will be able to quickly and smoothly move from position to position. 

FretPro is made by a single guy in California on a mission to help guitarists. It has a smart interface and bonus points for this high-tech method of learning, so it wraps up the list with a bang.

Specs/availability: Available for iPhone on the App Store

Price: Free

Final Thoughts

So there you have it. Whilst some of these apps have similar games, each guitarist is different and there are ways that work for some which don’t work for others. It’s all about finding your learning style and how best to unlock it for total fretboard mastery. Plus, a deeper knowledge and understanding of how the notes and patterns connect to each other means you too can begin to construct soon from the ground up.

Want to improve your guitar playing? Check out both our software section for more helpful programmes, plus our archive of tutorials.

Guide to Using Plate Reverb for Guitarists

Any guide to using plate reverb needs to show you how sound works. Ever looked at the different reverbs on your DAW and wanted to understand them better? In this article, we go into plate reverb, why it is one of the most interesting kinds of reverb, and how to use it on guitar. Read on to find out more.

What Is Plate Reverb?

Plate reverb, like any reverb, is an effect which you add to a dry track. This is designed to give the dry recording a more natural sound, However, plate reverbs themselves don’t attempt to be true to nature. Unlike other kinds of reverb, no plate reverb ever tries to copy real-life reverb in a specific kind of space. Instead, plate reverb plugins are modelled off physical plate reverbs, where sound passes through a metal plate made of one of any different metals, often steel. The vibrations are picked up by a microphone, and they travel down the rest of the signal chain.

Guide to Plate Reverb: How Does It Work?

To understand more about plate reverb, it helps to know why mix engineers add reverb in the first place. When engineers mix sounds, the soundproofing of the studio ensures the sound is very dry. At this stage, it lacks both reverb, and delay.

However, listeners need reverb. It’s everywhere, regardless of whether you’re in a concert hall or a church. As a result, tracks sound strange without it. Therefore, in the first analogue recording studios. producers and engineers found ways to add reverb artificially, and one of the best-loved of these is plate reverb. This works by suspending a metal plate within a container via springs, which vibrates as sound hits it, and a microphone amplifies the resulting soundwaves. These then go back down the signal chain. Due to the way sound interacts with the plate, plate reverb at first very bright. It only becomes much dimmer and darker towards the tail end of the sound wave. 

You can hear plate reverb on many ’60s and ’70s recordings. In fact, Abbey Road studies actually contributed to their popularity. Their brightness adds an ethereal sound. Meanwhile, their character comes from the darker frequencies they carry. 

What Options Are On the Market?

Physical plate reverbs are incredibly expensive to own in real life. On their Dark Side of the Moon album, Pink Floyd actually used a version of the world’s first plate reverb, created by German company EMT, who called it the EMT 140.

However, like other parts of the analogue studio, they are now easy to mimic digitally. Below is a quick guide to plate reverb plugins which are affordable for the average musician:

Reverbs:

  • Soundtoys Little Plate – 99 USD
  • Arturia Rev Plate-140 – 100 USD
  • Valhalla Plate – 50 USD
  • Black Rooster Audio RO-140 – 29 USD
  • Variety of Sound epicPlate – FREE

Plugins which contain plate reverb:

  • Relab Development LX 480 – 99 USD
  • IK Multimedia T-RackS Sunset Sound Studios Reverb – 61 USD
Soundtoys Little Plate

Most plugins can be bought on Pluginboutique.com and if you use this link to make a purchase you are helping us a lot because we get a small kickback.

Plate Reverb in Recording: An Introduction

You may have most commonly heard of plate reverb used for vocals or drums. This is because of the high frequency of sonic vibrations in metal. In fact, this is where their smoothness and brightness come from. Another place you might hear them used is on strings. But what about for guitar? Plate reverb is best known for adding a spooky or ethereal tone. It’s great for psychedelic guitar, as well as for guitar solos. It is also very useful for creating a sense of atmosphere. Your guitar by itself might not sound hugely atmospheric, but if you’re working without much other gear or software, a good plate reverb plugin can do a lot can boost the levels of sonic interest infinitely.

Classic Psychedelic Sounds: Plate Reverb Ideas and How-To

When using plate reverb in recording, keep in mind its ethereal sound and its brightness. It is great if you want to add some shine to mid-frequency heavy guitar and riffs – perfect if you want your guitar to pop out in contrast to your bass frequencies to prevent things from sounding muddy.

However, plate reverb can really come into its own on softer lead guitar lines. Solos in slow tracks can benefit from it, and Dark Side of the Moon is a great example. It’s good for rock, pop, indie, and any experimental guitar. It’s not as great for metal, hard rock or punk, although it can be used. Its tendency to blur all reverberations together does give it a rather alien sound. Therefore, if you really want to get more out of it, the trick is to combine it with something else. Some good combinations are: 

  • plate reverb blended in at a low level with a chamber reverb. A chamber reverb has as much of an unusual vibe, but is a bit more natural.
  • plate reverb combined with hall reverb. To amplify the dramatic effect of the plate reverb’s otherworldliness, combine it with a big hall reverb.
  • plate reverb with room reverb. For a classic sound, especially on a more low key track, mix plate reverb with a room reverb. Blend the plate reverb in at a low level so as not to be overpowering. 

Guide to Plate Reverb: What Else Is Good to Know?

If you are more used to sound in the real world, think of plate reverb in general as an effect like you would get in your pedals. Don’t try to think of it as mimicking physical echoes and reverberations. Without getting into how it works, remember it’s the darkest, spaciest reverb. As it’s less natural, it’s best to use it when you want to modify your guitar for something more atmospheric. Alternatively use it in tandem with any of the reverbs which mimic a natural space (room, hall, chamber). However, plate reverb is a great gateway to using your plugins and DAW as an instrument in itself. This can be one of the most challenging things for guitarists, who sometimes feel more comfortable with a physical instrument. However, this is a great place to start.

Final Thoughts

So there you have it – a quick introduction to plate reverb. This is how it works, and the best contexts in which to use it. With more understanding and time, it can become a staple tool for your production. In fact, different reverbs really expand the range of sounds you can apply to your guitar during the mixing process. Just keep in mind their unique qualities. This means that you’ll be able to judge where this reverb, like any, adds to your guitar – or when to leave it. When used correctly, it is a very intense and interesting effect. As a result, even exploring it a little can totally alter the way you think about your sound. 

Liked this article? We have more in our tutorials section here.

5 Ways to Get the Most Out of Your Amp

To get the most out of your amp, it’s good to understand it as a whole. Knowing how to think about music and about your sound is the most important part of working fluidly with your gear. While many musicians want better gear, here are a few hacks, fresh perspectives, and tips which will help you think about your amp differently – meaning you can make do with whatever you have and still have it sound amazing.

Get the Most From Your Amp: Know Your Tone

Every amp is unique. In fact, even with two different models, the condition in which the amp is kept plus other factors such as its age will affect the sound. Therefore, working out what the average tone of your amp is can be a lifesaver. Is it a rich valve amp? Does it tend to be heavy on the top end? If you get your knowledge of these parts worked out, knowing what to change when you dislike a sound becomes really easy.

Things to try: List five things you don’t like about your tone. Then, spend an afternoon or so playing around with your amp to see how and when these quirks vanish. It might be that you hit on the perfect combinations of settings to get rid of that annoying top end which has always bothered you.

Phase 2: Know the Rest of Your Gear

You might just be jamming, but things get complicated when you start adding pedals. Get to know all your gear inside and out. This isn’t just about being good with your gear. It’s about really knowing the ins and outs of everything plus how it connects. That way, you can separate what piece of kit is affecting which aspects of your sound. Ultimately, it also takes into account parts of your guitar such as the pickup switch and tone knobs. These can really affect the sound coming out of your amp. There’s actually a lot the guitarist needs to take into account to influence the ultimate sound. Being able to separate each piece of kit is key in order to craft the sound you want. 

Things to try: Think of every aspect of your gear, from your pickups to any pedals you have. Then, try improvising a guitar solo while varying each aspect and notice how the sound changes. This can help you tune your ear to all the nuances.

Understand Your Options – And How they Effect Each Other

This gets more into the nitty gritty of your amp itself. Most amps have a couple of tone knobs and a dial for distortion. Some brands such as Marshall geared more towards certain genres of music. Realise that distortion on one amp will sound very different to distortion on another. This might sound obvious, but this is one mistake beginners tend to make before they have found their sound. This fallacy is to treat every amp like an average fender or orange amp. Some amps also have delay and reverb. These can come in handy depending on the room you’re in. A room with a lot of soft furnishings won’t have the natural echoes you might desire when recording.

No option on an amp works in isolation. Cranking up both the distortion and the reverb at the same time can be overwhelming. However, another common first-time habit is to simply keep adding more effects when your sound doesn’t satisfy you. Instead, learning how all dials on your amp affect each other means you can achieve the desired sound with precision.

Things to try: In the same way your DAW allows you to save presets, once you find the perfect combination of settings on your amp, take a photo for future reference. You might be surprised how much of a lifesaver knowing your sweet spot on your amp can be in the stress before a gig!

Get the Most From Your Amp in the Studio: Know How to Record

It goes without saying that recording as opposed to playing live or just jamming takes some specialist know-how. However, the settings you need will be very different to those you want live. As a result, the options you use will change if you’re going from a recording session to a live gig. Keeping track of this means eventually you will spot patterns. Therefore, transitioning from one to the other will be very easy. It also gives you the subconscious know-how to create news settings for certain sounds and places. 

Things to try: The studio can be daunting. Research some of the gear you’re using beforehand. Does it favour rich, analogue amps? Taking this into account, mess around with your amp to see how you could adapt your typical settings to the quirks of recording.

When Things Seem Tough: Work With What You’ve Got

You may dream of having a huge Marshall stack, but with your setup, it’s probably not realistic. However, it can be very satisfying to work with what you’ve got in terms of recreating sounds. You may not sound like Dave Grohl, but if you really get to know your amp, you can fake it. Copy your favourite artists, listen to their interviews, and learn what settings they use. Then, find the closest approximation on your own amp. This will also help show you the difference between your gear and other people’s. And with this kind of experimentation in context, you will develop a broad, holistic overview of how sound works. In the end, this is much more useful than a narrow set of skills for your studio only. 

Things to try: Try restricting yourself. After all, tone is in the fingers. If you only allowed yourself to use the gain knob without touching the rest of your amp, what creative possibilities might you be forced to unlock?

Final Thoughts

Whilst these aren’t hard and fast rules, these hacks can help you understand how to work with your gear as opposed to simply getting it to work for you. It sometimes can sound a bit unusual, but the best musicians treat their music like a parallel world where they can really get into creative flow. Understanding how every aspect affects the overall result is the first step to getting that world to really fit together. As a result, these tips are the first step to thinking differently about your playing.

Like tutorials? You can find more here.

Soundtrap – Spotify’s Collaborative DAW: A Quick Rundown of Pros and Cons

Soundtrap pros and cons tend to include much of the conversation around Spotify as a whole. While some in the music industry are really happy with its ease of use, other musicians feel it doesn’t quite cut it and oversimplifies the creative process. Read on for a look at both sides.

Soundtrap Pros and Cons: How it Works

Soundtrap is essentially an online DAW. You can make music and bring in collaborators from all over the world, in groups. It makes things easy for long-distance projects, which are now a staple of the digital music era. However, the first impression is it’s geared towards a particular type of producer. It also takes this model and expands it to other areas of sound design.

Soundtrap operates on a subscription basis and starts with Soundtrap Free. After this, it advertises four tiers: Soundtrap for Music Makers premium and supreme, as well as Soundtrap for Storytellers, designed for podcasters, and Soundtrap Complete, which has the most features. All that’s needed after this is a simple login. Then you can begin sharing your projects with friends and collaborators. There are chat features and you can tune into projects and make adjustments, too.

Successes and Failures so Far:

It’s important to remember that Spotify started in advertising, not in music. Soundtrap’s taglines are a bit unusual for a serious producer or musician. The names of the tiers and how it’s targeting the education sector, too, mean Soundtrap feels like a very simplified DAW. However, these points make Soundtrap relatively unappealing to a large proportion of the music industry. For starters, musicians tend to work in certain ways and as a large company, Spotify isn’t familiar with this.

Essentially Soundtrap is the recording process democratised. The mystery which previously went on only in famous recording studios is now openly available to anyone. However, mainstream DAWs such as logic still sometimes prove to be too complex for the complete novice to work with. This is especially true if your goal is not necessarily to become a producer, but you need a DAW as part of a side project such as for a film score. This is where Soundtrap comes in. It is really good at combining lots of pre-existing ideas. As a result, is perfect for this sector of the market. It also removes a lot of the steep learning curve which comes with DAWS.

Main Competitors:

Obviously, Soundtrap’s competitors include other popular DAWs. However, Soundtrap differentiates itself from these by generalising as opposed to specialising. DAWs such as FLStudio and Ableton market themselves towards particular types of musicians. Even Logic, with its heritage instruments and aesthetics, is the go-to DAW for a specific industry subculture. In this case – the pro songwriting, Nashville, California, and pop/rock audience. Yet who is Soundtrap best for? Spotify’s size is also one of its greatest flaws. The company is so large that it becomes a jack of all trades. This same principle is at play with Soundtrap. As a result, it works for those who look at things from a general perspective. This tends to include educational institutions and beginner sound designers.

One major competitor for the social collaboration aspect is Audiomovers ListenTo, which we reviewed last month. Nevertheless, ListenTo is actually far more in line with the writing process at an industry level. It also offers a slicker and more streamlined service, prioritising high quality. This includes control over specific aspects of the transmission process such as latency. 

Soundtrap Pros and Cons: The Good Points

Soundtrap has many of the same pros and cons as Spotify itself. Spotify is primarily an expert in music consumers. These are people who have music on in the background but who don’t really deep dive. As a result, this audience excludes the vast majority of sound designers and producers and even a significant percentage of guitarists and other instrumentalists. Soundtrap is therefore a unique product of this – a DAW geared towards not geeks but casual creators. This makes it less than exciting for serious music lovers – but a real lifesaver for the increased number of those now interested in music creation.

It’s also collaborative, which means that it is perfect for teaching. This is in line with how Soundtrap is a social endeavour. It follows the same pattern as how Spotify allows users to share playlists and listen together. It’s clear Spotify targets Soundtrap for a certain kind of creator. 

Soundtrap’s Flip-Side: The Bad Points

However, this has its downside. Many of the things found only on Soundtrap are best for novices. Its preset beats make it really easy to create music quickly which is perfect for a school or university project, but on an industry level doesn’t quite hold up. As a result, some of the platform’s marketing, which seems aimed towards serious musicians, falls short. There is the air of a large company trying and failing to keep up with the times. This is not to say Soundtrap is bad, per se. It’s just that its target audience isn’t what you might expect and it’s prone to false advertising.

Soundtrap Pros and Cons: Overall Assessment

Soundtrap tries to do a lot in one go. Its values and the kind of musical interaction it promotes are similar to Spotify as a whole. It prioritises sharing and socialising similar to a social media platform as opposed to the serious studio work promised by potential competitor ListenTo by Audiomovers. Again, this doesn’t mean Soundtrap is bad. It just means it’s niche seems more within education or casual music creation.

Therefore, Soundtrap is fun if you’re a diehard Spotify user and you need a usable DAW with a small learning curve. It’s fantastic if you need shortcuts and you don’t want to teach yourself full music production. The designers gave it some really good software development, so you can push it to quite high levels for independent artists. However, it’s just not the kind of challenging, stimulating software which really pro gear fanatics would use – but Spotify didn’t intend it this way.

Final Thoughts:

Soundtrap pros and cons are very dependent on whether you like Spotify’s overall way of doing things. Some people love it. Some hate it. It focuses on big business and is another wing of the Spotify behemoth. Therefore, it’s a bit one size fits all. Producers can use it for their own purposes as a result of this sort of blank slate. Yet, it’s also lacking some of the things which really draw music lovers to gear. Yet if you need something easy to understand and want to start producing quickly, it’s worth a shot.

If you liked this article, check out more on software here, as well as our review of ListenTo by Audiomovers here.