

Last Updated on February 12, 2021 by IDS Team
FL Studio is, without any doubt, one of the best digital audio workstations that you can use for the recording of pretty much any genre of music.
Of course, it’s especially known for its compatibility with various plugins for different synths and effects, making it one of the best options for electronic music.
Developed by the Belgian company Image-Line Software and released originally as Fruity Loops back in 1997, it has now become a go-to DAW for countless creative music makers.
However, just like with any great piece of software you find in 2021, you might have some performance issues due to certain compatibilities or just inadequate hardware components of your computer.
If this is the case with you and FL Studio don’t worry, you’re not alone in this.
If something is running slow, or just not as fast as it is supposed to, there’s always a solution.
With this being said, let us look at the different ways on how to make FL Studio run faster.
And if you still can’t make FL run smoothly, maybe it’s time to buy a new laptop. We have a very good comparison and review set on the best music production laptops on the market today.
Monitoring your CPU
The first thing you need to do is to check out the CPU load directly in the FL Studio.
In the top screen of the FL Studio, you’ll see a small window tracking down CPU usage and RAM memory usage.
In case any of these values are getting too high, it means something’s not right.
Symptoms might include unwanted clicks and glitches in the audio. If you’re experiencing poor performance or any other issues, keep your eyes on the memory and CPU usage window.
Configuring audio settings for FL Studio
Poor performance sometimes might be due to the inadequate settings for the hardware you have.
For instance, if you set the buffer size to the minimum, or somewhere close to it, but your computer can’t handle it, you should consider raising it to the spot where it stops being an issue.
The bigger the buffer size, the easier your computer will respond to all the things going on in the program.
However, a larger buffer size increases latency, which can be an issue with the real-time instrument or vocal recording.
In case you’re not doing any kind of recording but just mixing, there’s no need to keep buffers at a lower level. But if you’re recording, try and find that sweet spot that doesn’t make it impossible for you to perform and that still allows normal operation.
For this, you’ll need to go to Options, Audio Setting, and then select the “Asio4ALL” or “FL Studio Asio” in the “Device” menu.
You can increase the buffer length to where it works best for you. Try and set the sample rate to 44100 Hz and the “Priority” to “highest.”
There are a few other switchable options in the audio settings, including the “Triple buffer” and “Mix in buffer switch”. Try stitching them on and off and see if there’s any change in the overall performance. If nothing happens, set them back the way they were.
Enable the “Smart Disable” feature in FL Studio
Another option you’ll find in the Audio Settings is the “Smart Disable” feature.
You can then enable it and go to Tools Menus, Macros, and then select the “Switch smart disable for all plugins.”
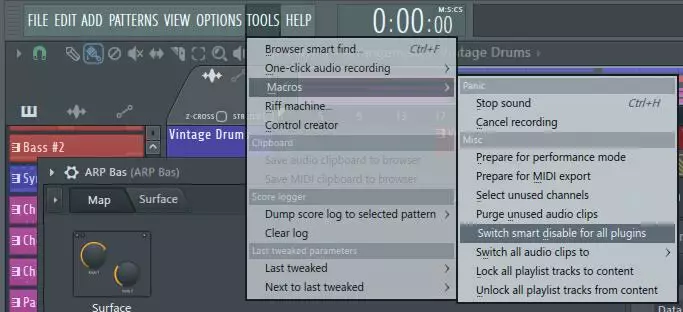
This way, all the instruments and effects plugins will be turned off when they’re not making any sounds. Depending on the type of project, this feature can significantly decrease your CPU usage.
You should also know that the Smart Disable feature is only active during playback. It will be disabled during any rendering.
Look at how many channels are you rooting in the FL Studio mixer
What you also need to be paying attention to is the number of channels you’re routing to in the FL Studio mixer. The larger the number of channels, the higher the chances that CPU load will rise faster than usual. In order to prevent this issue, you might want to plan everything out in advance before starting a project.
Look whether your plugins are 32 or 64 bit
Whenever you’re using any kind of plugins in the FL Studio, it is important to see whether they are the correct VST version.
For instance, if you have a 64 bit FL Studio version, then you should use only 64-bit versions of VST plugins.
Using the 32-bit plugin versions on the 64 bit FL Studio, there’s a high chance your CPU usage will skyrocket. This is because your computer will need to adjust to the same version. This whole process is referred to as “bridging.”
Check whether your CPU is running at full speed
There are also things you need to check outside of the FL Studio itself.
For instance, you might have a certain power saving setting on that is preventing your CPU from running at its full speed.
If you’re using Windows, then open up the settings (can be accessed via Start menu), go to the Control Panel, System and Maintenance, and then select Power Options. You should then select your power management to the “High Performance Mode.” If you’re using a laptop, always make sure that you’re plugged in and not running solely on the battery.
As for macOS, go to System Preferences, then Energy Saver, and then find the “Computer Sleep” slider and select it to “Never” mode.
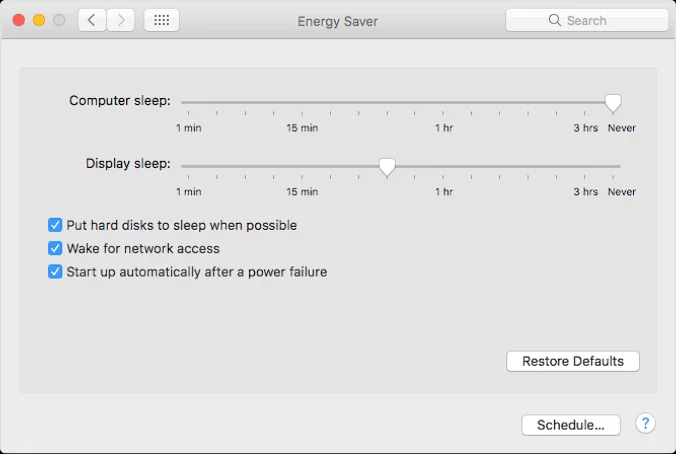
Or, instead, you can check the box labeled as “Prevent computer from sleeping automatically when the display is off.”
There are a few other power-related features in the settings that might help you use your computer’s full CPU potential.
Final Thoughts
We hope this guide has helped you in making FL Studio run great. If you still encounter issues with your studio, maybe your laptop is too old and needs an upgrade. In this direction, we would like to point you in the right direction, to our article on the best music production laptops on the market in 2021.