Last Updated on April 3, 2017 by IDS Team
This week we continue our Maschine Tips series (read our first tutorial here – NI Maschine Tips: Record Mutes and Solos)
Maschine doesn’t have any multi-effect units internally, but what’s to stop you from building your own. I mean, sometimes you just don’t want to buy a new plugin. Building your own multi-effect won’t cost you anything except for a few extra pads on your hardware and you might learn something about multi-effects processing along the way.
Let’s say you have a kick drum that’s lacking a good attack phase. You could always layer it with a different kick and slap on Maschine’s internal Transient Shaper, but it’s not multiband. Meaning that you wouldn’t have any control over the frequency ranges that will be affected. Here I’ll show you how you can make your own custom multiband transient shaper and maybe save a couple of bucks.
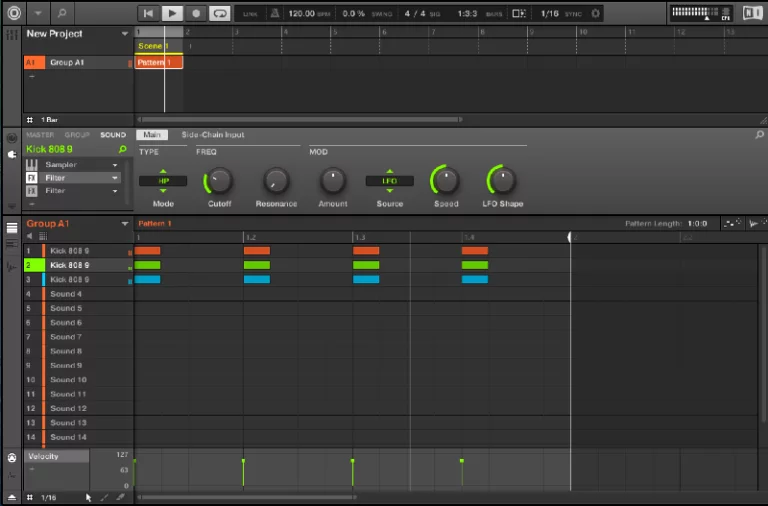
- Load your sound on a pad and duplicate it twice so you end up with 3 pads with the same sound.
- Make a small pattern so the sound is playing while you change parameters.
- Put Maschine’s filter plugin on the first 3 pads.
- Now adjust each pad individually so that each pad covers a different range of frequencies for example: Pad 1 (20Hz-250Hz), Pad 2 (250 Hz-1 kHz), Pad 3 (1kHz-20kHz). You can also map a group macros to the filter cutoff. And don’t forget to put resonance to 0. For the pad 2 you need 2 filters (HP at low frequency and LP at high frequency)
- Now put an instance of Transient Shaper after each filter on every pad and adjust parameters to taste.
Voila! You’ve just built your own custom multiband transient shaper. Mind you, there are much better free filters available to do this with, I only used Maschine’s internal filter in this example because it’s common to all owners of Maschine. The good thing about building your own effects is that no one else is going to have the same one you have. It’s also probable that you will develop your own sound even further. Using this method, you could go on to create your own multiband compressors, EQ and distortion units right inside Maschine and it’s a fairly simple process. What makes it even better is that you can still automate the different parameters and save them as a Group or Sound ready to be loaded into your next project.
Alternatively you can create separate group for the effect and send signal sound to three different effect pads: 1st via sound output, 2nd and 3rd via the AUX sends – don’t forget to set send level to 0db!
[optin title=”Get Free Plugins and Best Deals” border=”true” text=”Enter your email address below to get free VST plugins and Best Plugin Deals notifications” buttontext=”Submit” leadlist=”625090″ successMessage=”Message has been submitted successfully.” errorMessage=”Failed to send your message. Please try later.” invalidEmailMessage=”Your email address does not appear valid.” collectfirstname=”false” collectlastname=”false” collectphone=”false” collectcompany=”false” id=”16968″]


